
Image Source: i.ytimg.com
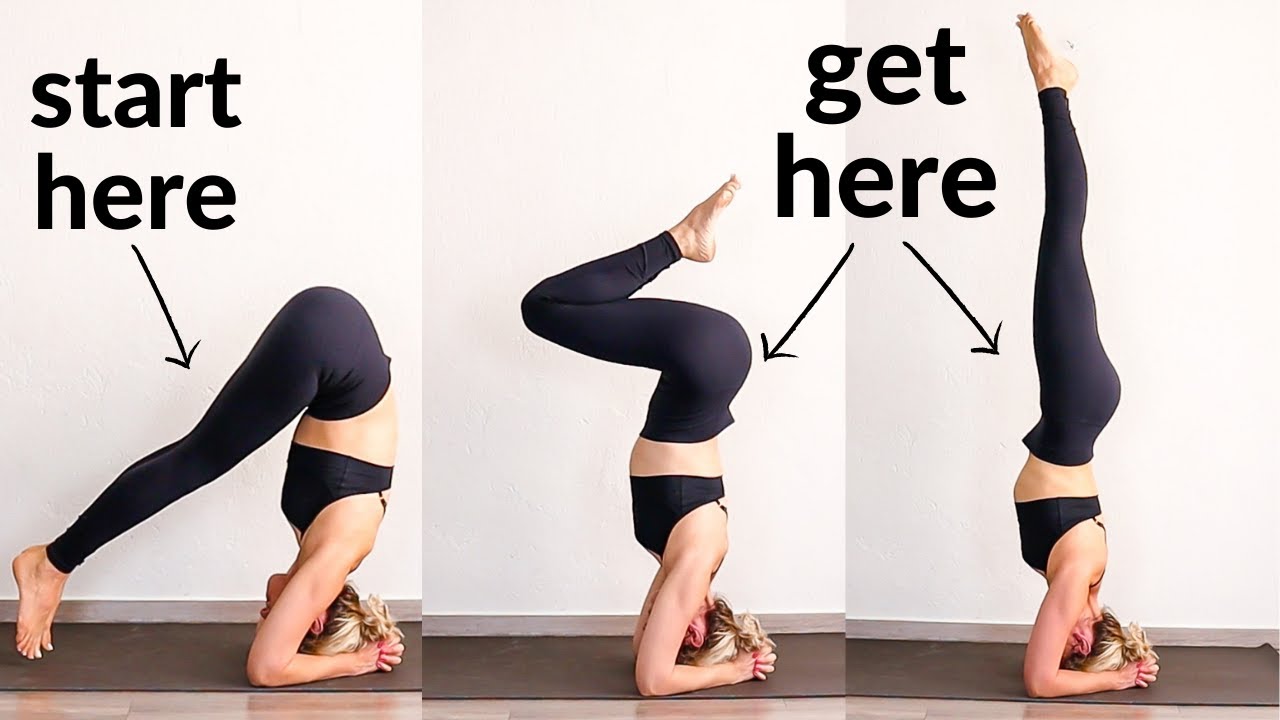
What is Salamba Sirsasana? Can a Beginner Do It Safely? Is it Hard?
Yoga headstand pose, known as Salamba Sirsasana in Sanskrit, is a major inverted pose. It means ‘Supported Head Standing Pose’. ‘Salamba’ means supported, ‘Sirsa’ means head, and ‘Asana’ means pose. Yes, a beginner can learn it safely, but it takes time, patience, and preparation. It is not a pose to rush into. It is considered an advanced pose, so it feels hard at first. But with the right steps and practice, you can build up to it. This guide will show you the Salamba Sirsasana steps and how to practice safely.
Grasping the Yoga Headstand Pose
The yoga headstand pose is often called the ‘king’ or ‘queen’ of all yoga poses. It asks you to balance your body weight on your forearms and the crown of your head. It’s not just about flipping upside down. It’s about building strength, balance, and focus. It also has many good things it can do for your body and mind.
Why Do Headstand? Exploring the Benefits of Headstand
Many people practice headstand because they feel good things from it. The benefits of headstand can be both physical and mental. Here are some of the plus points:
- More Blood Flow: When you are upside down, blood flows more easily to your head. This can make you feel more awake and clear-headed. It might help brain function.
- Stronger Core: Holding the headstand makes your stomach and back muscles work hard. This builds a strong center.
- Stronger Arms and Shoulders: Your arms, shoulders, and upper back hold your body up. Over time, they get much stronger.
- Better Balance: Learning to balance upside down helps improve your sense of balance in all parts of your life.
- Calmer Mind: Focusing on balancing can quiet your busy thoughts. It asks you to be fully in the moment. This can lower stress.
- New Viewpoint: Seeing the world upside down can literally change your view. It might help you see things in a new way mentally too.
- Boosted Mood: Doing challenging poses you thought you couldn’t do feels great. It builds confidence and can lift your spirits.
- Helps with Digestion: Being upside down can gently move things in your belly. This might help food move through your body better.
- Less Swelling in Legs/Feet: If you stand a lot, blood can pool in your legs. Being upside down helps blood flow away, reducing puffiness.
These are just some of the reasons people work towards this pose. But remember, safety comes first. Do not push yourself too hard, too fast.
Getting Your Body Ready: How to Prepare for Headstand
You need both strength and flexibility before you try headstand. It’s like building a house; you need a strong base. Trying without being ready can lead to hurt. Getting ready means working on specific yoga poses for strength.
Building Strength for Headstand
You need strength in your arms, shoulders, upper back, and core (stomach and back). These muscles help hold your body steady and protect your neck.
Here are some important yoga poses for strength that will help you get ready:
- Dolphin Pose: This pose is like Downward-Facing Dog, but you are on your forearms. It builds strength in your shoulders and arms. It also helps you feel weight on your forearms, which is key for headstand.
- Start on hands and knees.
- Place forearms on the mat, hands pointing forward.
- Tuck toes, lift hips up like a tent.
- Press down through forearms.
- Let your head hang freely.
- Hold and breathe.
- Plank Pose: This pose builds full-body strength, especially in the core and shoulders.
- Start on hands and knees.
- Step feet back so your body is a straight line from head to heels.
- Keep hands under shoulders.
- Pull belly button towards spine.
- Keep your back flat, don’t let hips drop or go too high.
- Hold firm like a plank of wood.
- Forearm Plank: Like Plank, but on your forearms. This is even better for shoulder and core strength needed for headstand.
- Start on hands and knees.
- Place forearms on the mat, hands clasped or palms down.
- Step feet back, body in a straight line.
- Keep core tight.
- Hold and breathe.
- Downward-Facing Dog: This pose strengthens arms, shoulders, and legs. It also helps stretch the back of your legs.
- Start on hands and knees.
- Tuck toes, lift hips up and back.
- Make an upside-down V shape with your body.
- Press hands down, send hips high.
- Let your head hang.
- Dolphin Push-Ups: From Dolphin pose, lower your forehead towards your hands, then push back up. This directly works the muscles used to keep your neck light in headstand.
- Boat Pose (Navasana): A great core builder. A strong core helps you lift your legs and stay stable upside down.
- Sit on the floor with knees bent.
- Lean back slightly, lifting feet off the floor.
- Shins can be parallel to the floor, or legs can be straight.
- Reach arms forward.
- Keep your back straight, chest lifted.
- Feel your core working hard.
Practice these poses regularly. Aim to hold Plank and Forearm Plank for 30-60 seconds. This builds the endurance you need.
Getting Your Mind Ready
Fear is the biggest block for most people trying headstand. It’s scary to think about being upside down.
- Start Small: Don’t expect to go right up on your first try. Work on the prep poses. Practice being on your forearms. Practice lifting just your hips high in Dolphin.
- Use a Wall: The wall is your best friend when learning. It gives you support and takes away the fear of falling over backward. We will talk more about using the wall later.
- Be Patient: Learning headstand takes time. Some people get it in weeks, others in months, or even years. Be kind to yourself. Celebrate small steps.
- Trust Yourself: Trust that your body can do it with practice. Trust the steps.
Picking Your Spot
Choose a clear space. Make sure there is nothing around you to bump into. Use a yoga mat on a firm floor. Avoid thick carpets or uneven ground. You can also place an extra folded mat or blanket under your head for padding, but make sure it is not too soft or thick, as this can make you unsteady.
Your First Try: Beginner Headstand Tutorial
This is your step-by-step guide for learning headstand safely, especially using a wall. Follow these Salamba Sirsasana steps carefully. Always practice near a wall when you are starting.
Setting Up
- Kneel Down: Come to your knees on the floor, facing a wall. You want to be close enough that when you go up, your feet or legs can touch the wall for support, but not so close that your head is jammed into it. About 6-10 inches away is a good start.
- Measure Your Base (Very Important!): This sets up your strong foundation.
- Place your forearms on the mat in front of you.
- Your elbows should be right under your shoulders.
- Clasp your hands together. Interlace your fingers firmly. Make a cup shape with your hands, leaving a space between your palms. This cup will support the back of your head.
- Check this distance: Your hands and elbows form a triangle or a solid base. This base must stay fixed. Do not let your elbows slide wider than your shoulders. This is a common headstand mistake.
- Place Your Head: This is also very important.
- Place the crown of your head on the mat. This is the flattest part on the top of your head. If you are unsure, find the spot by tilting your head slightly forward.
- Your clasped hands should cup the back of your head.
- Make sure the back of your head rests into the base of your thumbs and palms, not just hanging there freely. Your hands support your head.
- Your head should be on the floor inside the triangle made by your forearms and clasped hands.
Moving Towards the Inversion
- Lift Your Hips: Tuck your toes under and lift your hips up towards the sky. You are now in a shape similar to Dolphin pose, but with your head on the floor.
- Walk Your Feet In: This is key to stacking your hips over your shoulders.
- Slowly walk your feet closer and closer towards your head.
- Keep your legs mostly straight, or with a slight bend if needed.
- As you walk in, your hips will move higher and get closer to being stacked above your shoulders and head.
- Walk in until you feel your weight shift more onto your forearms and head. Walk in as far as feels comfortable. You should feel light in your feet.
Lifting Up (Using the Wall – Beginner)
From the position with hips high and feet walked in:
-
Choose Your Lift (Safest Way): You have two main safe ways to lift your legs, especially with the wall:
- One Leg at a Time (Bent Knee): This is often easiest for beginners.
- Bend one knee and hug it towards your chest.
- Keep walking the standing foot in a tiny bit more.
- Push off the standing foot gently and bring the second knee to meet the first one.
- Bring both knees together towards your chest, like a little ball. Your shins are parallel to the floor, heels towards your butt. Your back is rounded slightly. This is Tadasana in Sirsasana (Mountain pose legs in Headstand).
- Your feet might gently rest against the wall here.
-
Both Legs Together (Bent Knee): If you have good core strength, you can try this.
- From feet walked in, bend both knees slightly.
- Pull your belly button in strongly.
- Use your core strength to slowly lift both feet off the floor by bringing your knees towards your chest at the same time. It’s like a slow, controlled curl-up for your lower body.
- Again, you end up with knees bent towards chest, shins parallel to floor. Feet might touch the wall.
-
IMPORTANT: Do not kick up into headstand. Kicking creates momentum that can easily make you fall or hurt your neck. Use strength and control.
- One Leg at a Time (Bent Knee): This is often easiest for beginners.
-
Find Your Balance (Bent Knee Position):
- Once your knees are bent towards your chest, feel your weight.
- Press down firmly through your forearms. This takes weight off your neck. About 80% of your weight should be on your forearms, 20% on your head.
- Engage your core strongly. This keeps your body stable.
- Your back might be slightly rounded here. This is okay when learning.
- Keep the back of your head pressing gently into your clasped hands.
- Breathe smoothly. Don’t hold your breath.
-
Straighten Legs (Optional, Once Stable):
- From the bent knee position, if you feel stable and supported by the wall:
- Slowly start to straighten your legs upwards towards the ceiling.
- Keep reaching through your heels or toes.
- Keep your core engaged. Try to straighten your back.
- Your legs might still be touching the wall. This is fine! Use the wall as a steady support.
- Avoid arching your back too much. Think of stacking hips over shoulders, knees over hips, ankles over knees.
Holding and Coming Down (Safely!)
-
Hold the Pose:
- Start by holding for a very short time, maybe 10-15 seconds, in the bent-knee position against the wall.
- As you get stronger and more comfortable, slowly add time.
- Listen to your body. If your neck hurts, come down right away.
- Keep pressing into your forearms. Keep your core active. Keep breathing.
- For beginners, holding against the wall is the main goal. Balance away from the wall comes much later.
-
Coming Down (Crucial for Safety!): This part is just as important as going up.
- Do not just fall down. Control your descent.
- If your legs are straight, slowly bend your knees back towards your chest.
- From the bent-knee position, slowly lower your feet back to the floor the way you came up. If you lifted one leg at a time, lower one leg back down, then the other. If you lifted both together, lower both together slowly and with control.
- Land softly.
- Once your feet are down, keep your head on the floor for a few breaths. Do not lift your head right away. Let the blood pressure adjust.
- Slowly lift your head and sit back onto your heels.
Rest Pose
- Child’s Pose (Balasana): This is the most important pose after headstand.
- From kneeling, bring your big toes to touch.
- Spread your knees wide (or keep them together).
- Fold forward, resting your belly between your thighs (or on top of them).
- Lay your forehead on the mat.
- Rest your arms back along your sides, or stretch them forward.
- Breathe and relax completely.
- Stay here for at least as long as you were in headstand, maybe longer. This helps your neck and body recover and helps blood flow return to normal gently.
This step-by-step guide gives you the foundation for safe practice. Remember, use the wall every time until you are very strong and steady in the bent-knee position against the wall for at least a minute.
Keeping It Safe: Safety Tips for Headstand
Headstand puts pressure on your neck if you are not using your arms and core correctly. Safety is key.
- Always Use Your Forearms: Press down firmly through your elbows and forearms. This takes weight off your head and neck. Most of your weight should be on your forearms.
- Place Your Head Correctly: Use the crown of your head. Never the forehead or the back of the head. Your hands support the back of your head.
- Keep Elbows In: Make sure your elbows stay right under your shoulders. If they splay out, your base is weak, and you put too much pressure on your neck. Measure and check your base often.
- Use a Wall: Especially when learning, practice headstand against wall. It stops you from falling and helps you find your balance. Don’t rely on the wall, but use it as a safety net.
- Engage Your Core: Pull your belly button in. A strong core helps keep your body stable and aligned vertically. This protects your lower back and neck.
- Do NOT Kick Up: Never kick your legs up into headstand. This uncontrolled movement can cause injury. Lift slowly using strength.
- Listen to Your Neck: If you feel any sharp pain or strain in your neck, come down immediately. Headstand should feel like effort in your arms and core, not pain in your neck.
- Know When Not to Practice: Avoid headstand if you have:
- Neck injury or pain
- High blood pressure
- Heart problems
- Glaucoma or other eye conditions
- Migraines or severe headaches
- Are menstruating heavily (some people avoid inversions during menstruation, listen to your body)
- Are pregnant (unless cleared by a doctor and experienced practitioner)
- Have shoulder or arm injuries
- Learn from a Teacher: The best way to learn safely is with a qualified yoga teacher who can watch you and offer hands-on help.
- Don’t Stay Too Long: Start with short holds (10-15 seconds). Build up time very slowly as you get stronger and more comfortable.
- Come Down Slowly: Control your exit from the pose. Do not just drop down.
- Always Rest in Child’s Pose: Give your body, especially your neck, time to rest after headstand.
Following these safety tips for headstand is not optional. They are vital for a safe and positive practice.
What Can Go Wrong? Common Headstand Mistakes
Knowing common headstand mistakes can help you avoid them.
- Elbows Splaying Out: Your base gets too wide. This puts too much weight on your head. Fix: Keep elbows stacked directly under shoulders. Re-measure your base if needed.
- Wrong Head Placement: Putting weight on your forehead or the back of your head strains the neck. Fix: Use the crown of your head.
- Not Using Forearms Enough: Letting too much weight sink into your head. Fix: Actively press down through your forearms and elbows. Feel the lift out of your neck.
- Kicking Up: Using momentum instead of strength to get up. This is unstable and dangerous. Fix: Practice the controlled lift, bringing knees to chest first, using core and arm strength. Always use the wall if you are tempted to kick.
- Holding Your Breath: Makes you tense. Fix: Breathe smoothly and evenly throughout the pose.
- Arching the Back: Happens when you try to straighten legs before hips are stacked or without core strength. Puts pressure on the lower back. Fix: Engage your core. Think of stacking your body in a straight line. Start by practicing the bent-knee shape (tuck shape) to find balance first.
- Looking Around: Moving your head can make you fall. Fix: Keep your gaze soft and steady, looking at one point on the floor or straight down.
- Giving Up Too Soon: Headstand is hard! It takes practice. Fix: Be patient. Celebrate small improvements. Keep practicing the prep poses and wall work.
- Trying Without Preparation: Not having enough strength or flexibility. Fix: Spend weeks or months practicing the yoga poses for strength and getting comfortable in Dolphin pose.
Recognizing these common headstand mistakes helps you practice smarter and safer.
Building Blocks: More Yoga Poses for Strength
Beyond the main prep poses, here are others that build overall strength and body awareness needed for headstand:
- Chaturanga Dandasana (Four-Limbed Staff Pose): Builds immense arm, shoulder, and core strength.
- Push-Ups: Classic strength builder for the upper body.
- Boat Pose Variations: Holding longer, adding leg movements.
- Plank Variations: Side plank, plank with leg lifts.
- Crow Pose (Bakasana): While an arm balance, it teaches you to round your back, engage your core, and shift weight over your hands/arms – useful body mechanics for inversions.
- Dolphin Pose Variations: Walking feet closer, lifting one leg up (Dolphin with one leg).
Adding these to your practice will create a stronger foundation for your inversion journey.
Adding More: Headstand Variations
Once you are solid and balanced in basic Salamba Sirsasana (legs straight up, away from the wall!), you can start exploring headstand variations. Only do these when you are very comfortable and stable in the main pose.
- Pike Legs: Lift up into headstand by keeping legs straight and lifting hips over shoulders, feet coming up last. Requires strong core and hamstrings.
- Straddle Legs (Upavistha Konasana in Sirsasana): Open straight legs wide to the sides. Requires hip flexibility and core strength to keep balance.
- Eagle Legs (Garudasana in Sirsasana): Cross legs like in Eagle pose.
- Lotus Legs (Padmasana in Sirsasana): Cross legs into Lotus pose. Requires very flexible hips and strong core.
- Tripod Headstand (Mukta Hasta Sirsasana): This is a different type of headstand where your hands are on the floor, not clasped, forming a tripod with your head. It requires different balance and strength. Learn this after mastering supported headstand.
These variations add new challenges for balance and strength. Always return to Child’s Pose after exploring variations.
Practice and Your Progress
Getting good at headstand takes consistent practice.
- Short, Regular Practice: It’s better to practice for 5-10 minutes several times a week than one long session.
- Warm Up First: Always do other yoga poses to warm up your body, especially your shoulders, core, and hamstrings, before trying headstand.
- Listen to Your Body (Again!): Some days you might feel strong, other days you might not. Respect how your body feels. If you are tired or stressed, skip headstand or just do the prep poses.
- Use a Journal: Write down your progress. How long could you hold Dolphin? Could you lift one leg today? Could you get both knees to your chest against the wall? Seeing your progress keeps you going.
- Don’t Compare: Everyone’s journey is different. Don’t worry about how fast others learn. Focus on your own safe progress.
Progress might feel slow, but each time you set up your base correctly or feel your core engage, you are building the foundation for success.
Ending Your Practice Safely: Coming Down and Resting
We talked about coming down safely, but it’s worth repeating how important it is.
- Control is Key: Lower your legs slowly, either back to the bent-knee position then down, or one leg at a time, or both together with control.
- Land Softly: Don’t drop your feet.
- Head Down: Keep your head on the floor for several breaths after your feet land. Let your body adjust.
- Child’s Pose: This is non-negotiable. Rest here for at least as long as you were upside down. It counteracts the inversion, stretches the back of the neck, and brings your breath back to normal.
Other helpful counter poses include:
- Dolphin Pose: A gentle way to stretch shoulders after headstand.
- Rabbit Pose (Sasangasana): A deeper forward fold that stretches the back of the neck gently. Kneel, hold your heels, tuck chin to chest, round back, place crown of head on floor (just crown, not weight on head), lift hips slightly. Be very gentle.
- Seated Forward Bend (Paschimottanasana): Stretches the back of the body and calms the mind.
- Savasana (Corpse Pose): Resting on your back at the end of your practice helps your body absorb the benefits of the practice, including the headstand.
Getting Clear On Headstand
Learning headstand, Salamba Sirsasana, is a journey. It needs strength, balance, and a calm mind. By following step-by-step instructions, using a wall for support, practicing prep poses, and putting safety first, you can work towards this powerful pose. Remember, listen to your body, be patient, and celebrate each small step forward. Headstand is not just about being upside down; it’s about finding stability and peace within a challenging shape.
Frequently Asked Questions About Headstand
How long should a beginner hold headstand?
Start very short. 10-15 seconds is plenty when you begin, even against the wall. Build up slowly over weeks or months. Listen to your body. If you feel any strain, come down.
What if I fall out of headstand?
This is why you use the wall when learning! If you feel unsteady or about to fall, especially backward, tuck your chin towards your chest and roll out of the pose onto your back. This protects your neck. Practice falling safely by the wall.
Can I do headstand if I have neck problems?
No, it is highly advised not to do headstand if you have a current or past neck injury or pain. The pose puts pressure on the cervical spine. Talk to a doctor or physical therapist first. There are many other great yoga poses you can do.
How much weight should be on my head?
Only about 20% of your body weight should be on your head. The other 80% should be supported by your forearms pressing down firmly into the mat. If you feel a lot of pressure on your head or neck, you need to press your forearms down more actively and engage your core.
Should my head hurt after headstand?
No. You might feel mild tiredness in your arms and shoulders, or a new feeling in your neck area, but it should never be painful. If your head or neck hurts, stop doing the pose and revisit your setup and preparation. You might need more strength or better form.
Can headstand help with anxiety?
For some people, the focus and control required in headstand can be very calming and help quiet a busy mind, which can reduce feelings of anxiety. However, for others, being upside down might increase anxiety. Listen to how you feel. If it makes you anxious, don’t do it.
How often should I practice headstand prep poses?
Practice the strengthening poses (Dolphin, Plank, etc.) regularly, maybe 3-5 times a week, as part of your yoga practice or workout routine. Practice the headstand setup (forearms, head placement, walking feet in) against the wall often, perhaps daily or several times a week, for short periods.