
Image Source: i.ytimg.com
Easy Guide: How To Do The Yoga Headstand Safely
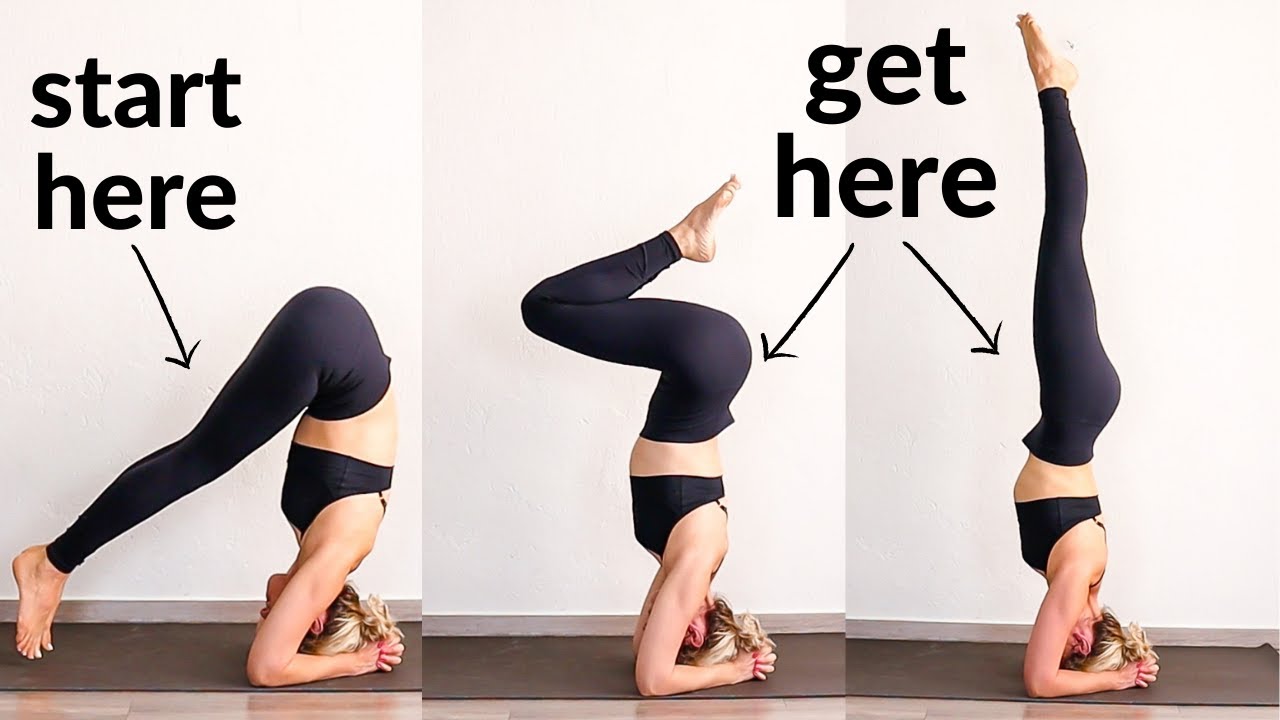
Do you want to learn the yoga headstand? It’s called Sirsasana in yoga. It is one of the most powerful Yoga inversion poses. An inversion pose means your head is lower than your heart. People often wonder, “What is Sirsasana?” or “Can I do the headstand?” Sirsasana is the King of all poses for many yoga fans. It is a pose where you balance on your head and forearms. Who is ready to learn it? While many people can learn it, it takes time, patience, and the right way to do it for Headstand safety. It’s not a pose to rush into. Learning it right protects your neck and body.
This guide will walk you through getting ready, the steps, and most importantly, how to stay safe.
Why Learn Sirsasana? Headstand Benefits
People love Headstand for many reasons. It offers great Headstand benefits. Going upside down changes how your body works for a little while.
Here are some good things people say about Headstand:
- Helps blood flow: Blood flows to your head. This can make you feel more awake and clear-headed.
- Builds strength: You use your arms, shoulders, and core muscles a lot to stay up. This helps with Building headstand strength.
- Calms the mind: Balancing needs focus. This can help quiet busy thoughts.
- Boosts mood: Doing something new and challenging can make you feel good about yourself.
- Helps with balance: It makes you better at finding and keeping your balance.
- Might help digestion: Inversions can change the pressure in your belly. This might help move things along.
- Can ease pressure on legs/feet: Taking weight off your lower body can feel nice.
- Changes your view: Seeing the world upside down is fun and different!
Many people find these benefits are worth the practice. But remember, everyone feels poses differently. What works for one person might not be the same for another.
Who Should Not Do Headstand? Headstand Contraindications
Even with all the good things, Headstand is not for everyone. Some health issues mean you should not do this pose. This is about Headstand contraindications. It means reasons why you should not try it.
Talk to a doctor or a yoga teacher before trying Headstand if you have:
- Neck problems or injuries: This is the most important one. If your neck hurts or has been hurt, do not do Headstand.
- High blood pressure: Going upside down can change blood flow in a way that is not safe if your blood pressure is high.
- Heart problems: Any heart condition means you should avoid inversions unless a doctor says it is okay.
- Eye problems: Conditions like glaucoma or detached retina can get worse with the pressure change from being upside down.
- Headaches or migraines: Sirsasana can sometimes make these worse.
- Ear problems: If you have issues with your inner ear or balance, inversions might make you dizzy.
- Recent stroke: Avoid inversions after a stroke.
- During menstruation (for some): Some yoga types suggest avoiding inversions during your period. Listen to your body.
- Pregnancy: If you had a strong inversion practice before getting pregnant, maybe. But starting inversions when pregnant is not advised. Always talk to your doctor.
- Any recent surgery: Especially on the head, neck, back, or shoulders.
- Severe fatigue: When you are very tired, your body might not be able to hold the pose safely.
If any of these are true for you, there are many other yoga poses you can do that are safe. There are also other inversion poses that are less demanding, like Legs-Up-The-Wall pose (Viparita Karani). Headstand safety is always first.
Getting Ready for Headstand: Headstand Preparation
You do not just jump into Headstand. Your body needs to be ready. This means working on strength and getting used to being partly upside down. This is all about Headstand preparation. It also helps with Building headstand strength.
Think of it like climbing a ladder. You need strong arms and a steady base before you reach the top.
Building Body Readiness
You need strength in a few key places:
- Core Strength: Your core is your body’s center. Strong core muscles help you keep your legs up and your body straight in Headstand. They stop your back from bending too much.
- Shoulder and Arm Strength: Your forearms and shoulders hold most of your weight in Supported headstand. They need to be strong and stable.
- Neck Awareness (Not Strength): This is super important. You do not want to put much weight on your neck. Your neck should feel long and free. The strength comes from your arms and shoulders pushing down, not your neck holding you up.
Simple Exercises to Help
You can do simple exercises every day or a few times a week to get stronger.
- Forearm Plank: Get on your forearms and toes. Keep your body straight like a board. Hold for 30 seconds or more. This builds core and shoulder strength.
- Dolphin Pose: Start on your hands and knees. Put your forearms on the mat. Walk your feet back to a plank shape on your forearms. Or, from table top, put forearms down, lift hips high like Downward Dog. Your body makes an upside-down V shape. Walk your feet towards your elbows. Keep pushing your forearms down and lifting your hips up. This pose is great for shoulder strength and getting used to weight on your forearms.
- Puppy Pose: Kneel on the floor. Keep your hips over your knees. Walk your hands forward, lowering your chest towards the floor. Your forehead might touch the mat. This opens your shoulders.
- Downward-Facing Dog (Adho Mukha Svanasana): This pose builds arm and shoulder strength and stretches the back legs. Push your hands down, lift your hips high.
- Plank Pose: Like Forearm Plank, but on your hands. Builds core and arm strength.
Doing these poses and exercises helps build the power you need safely. Do them regularly.
Getting Used to Being Upside Down
Your body also needs to feel okay with your head below your heart.
- Dolphin Pose (again): It’s a good step before Headstand. Your head is low, but no weight is on it.
- Rabbit Pose (Sasangasana): Kneel, then round your back and bring your forehead towards your knees. Reach back and hold your heels. The top of your head is on the mat, but the weight is on your knees and arms holding your heels. It’s a gentle way to put slight weight on the head point used in Headstand, but it is not the same pose or weight.
- Child’s Pose (Balasana): Always rest here after trying any pose where your head is down. It helps blood flow return to normal.
Spending time in Dolphin Pose is one of the best Headstand preparation steps. It uses the same arm position and builds the right muscles.
Learning the Pose: Headstand Pose Steps
Okay, you’ve been working on strength and getting ready. Now, let’s look at the Headstand pose steps. It’s best to learn this with a teacher or against a wall for Supported headstand. A wall is your friend when you start. It stops you from falling over.
Important: Have a clear space around you. Use a folded blanket or mat under your head for cushioning, but not so soft that it makes you wobbly.
Here are the steps:
- Start on Your Knees: Kneel on your mat.
- Measure Arm Distance: Put your forearms on the mat. Your elbows should be right under your shoulders. A good way to check is to grab your opposite upper arms with your hands. Where your elbows are is where they should go on the mat. Then, put your forearms down from there.
- Clasp Your Hands: Bring your hands together in front of you. Link your fingers tightly. Your hands make a little cup. This creates the base for your head. Keep your forearms pressing firmly down into the mat. Do not let your elbows slide wider than shoulder-width. This is key for Headstand alignment.
- Place Your Head: Lower the crown of your head to the mat inside your clasped hands. The back of your head rests against your hands. The very top, flat part of your head (the crown) is what touches the floor. Not your forehead, and not the back of your head.
- Lift Your Hips: Tuck your toes under and lift your hips towards the sky, like you do in Downward Dog. Your legs are straight or slightly bent.
- Walk Your Feet Closer: Start walking your feet towards your head. Keep your legs as straight as you can, lifting your hips higher. Walk until your hips are mostly over your shoulders. At this point, your back should be quite straight up and down. You should feel light in your feet.
- Lift One Leg (Option 1 – Slow Lift): With your hips stacked over your shoulders, gently lift one leg up towards the sky. Keep the leg straight and strong. You might stay here and practice balancing on your forearms with one leg up.
- Join the Other Leg (Option 1 – Slow Lift): If you feel stable with one leg up, slowly and with control, lift the second leg to meet the first one. Keep your core strong and your body straight. Think about lifting from your core, not kicking up.
- Lift Both Legs (Option 2 – Bent Knee Lift): From the position where your hips are over your shoulders and you feel light in your feet, bend your knees. Bring your heels closer to your bottom. Lift your bent knees off the floor towards your chest. Keep your core strong. You can stay here in a tucked shape first.
- Straighten Legs (Option 2 – Bent Knee Lift): From the tucked shape, slowly straighten your legs up towards the sky. Point your toes. Keep your core tight and your legs active.
Once you are up, focus on your Headstand alignment.
Getting the Pose Right: Headstand Alignment
Good Headstand alignment makes the pose safe and stable. Bad alignment puts too much weight on your neck.
- Push Down with Forearms: This is number one. Actively press your forearms and wrists down into the mat. This lifts your shoulders and neck slightly, taking weight off your head. Your hands act as a strong base.
- Lift Shoulders: Pull your shoulders away from your ears. Do not let your shoulders sink and put weight on your neck. Think about getting longer in your neck.
- Keep Body Straight: Imagine a straight line from your forearms, through your shoulders, hips, and all the way up through your legs and feet. Avoid letting your hips push too far back or forward. Engage your core to keep this line.
- Legs Active: Your legs should be straight and strong, like two pillars. Point your toes or flex your feet (pressing through the heels). Active legs help with balance and keep the body in one line.
- Neck Long: Do not crunch your neck. The weight should be on the crown of your head, with your hands supporting the back of your head. Your neck muscles should not be holding your body up. Your forearms and shoulders are doing the main work.
Using a wall helps you feel this straight line. If you are against a wall for Supported headstand, let your heels gently rest on the wall. Focus on pushing down with your forearms and lengthening your body up.
Using a Wall for Safety: Supported Headstand
When learning, the wall is essential for Headstand safety. It gives you support and builds confidence. This is called Supported headstand.
How to use the wall:
- Set up your mat and blanket a few inches away from the wall.
- Place your forearms and head down as in steps 1-4 above, with your head pointing towards the wall.
- Walk your feet towards the wall.
- Lift one leg up the wall. Place your heel on the wall.
- Pushing off the floor with your other foot, lift your second leg up the wall.
- Adjust so both heels are on the wall. Your back and legs should be straight up the wall.
- Focus on your Headstand alignment: push forearms down, lift shoulders, keep body straight.
- Try to lift your heels gently away from the wall for just a second or two to feel balance, then put them back.
- Practice holding the pose against the wall. Spend time feeling stable here.
Using the wall helps you build Building headstand strength and learn the correct Headstand pose steps without the fear of falling. It also helps you understand the feeling of a straight line from shoulders to feet.
Coming Down Safely
Getting down from Headstand is as important as getting up. Do it slowly and with control.
- From the full pose, bend your knees towards your chest (returning to the tucked shape, step 9 from above).
- Slowly lower your bent knees towards the floor.
- Once your feet touch the floor, stay there for a moment with your head still down.
- Gently sit back onto your heels, bringing your forehead to the mat, and rest in Child’s Pose (Balasana).
- Stay in Child’s Pose for at least as long as you were in Headstand. This lets your blood pressure and body return to normal slowly. Do not stand up too quickly after any inversion.
Rushing out of Headstand is a common mistake and can make you dizzy or strain your neck. Patience is key.
More on Headstand Safety
Let’s talk more about Headstand safety. It’s the most important part of learning this pose.
- Do Not Force It: If your body does not feel ready today, do not push it. Maybe you are tired, or your neck feels stiff. Listen to your body.
- Learn from a Teacher: The best way to learn safely is with a qualified yoga teacher who can watch you and help your alignment. They can give you tips for your specific body.
- Use a Wall (Seriously): Do not try balancing in the middle of the room until you are very comfortable and stable against a wall. The wall is a safety net.
- Be Patient: Learning Headstand takes time. Weeks, months, or even longer. Do not get frustrated. Celebrate small steps, like feeling lighter in your feet, or getting one leg up.
- Know Your Limits: If you feel any sharp pain, especially in your neck, come down right away. It is not worth getting hurt.
- Avoid Neck Weight: Again, this is vital. The weight is on your forearms and hands pressing down, creating lift. Your neck is just helping to balance, not hold weight. Imagine you could slip a piece of paper under your neck without much trouble (not actually recommended!).
- Practice on a Good Surface: Use a yoga mat and maybe a folded blanket. Avoid hard floors or surfaces that are too soft or bumpy.
- Have Space: Make sure you have room to fall without hitting furniture or walls.
- Avoid Kicking Up: Trying to kick strongly into Headstand can cause you to fall over or put sudden strain on your neck. Use controlled lifts, like walking your feet close or lifting with bent knees first. This goes back to the Headstand pose steps and doing them slowly.
Learning Sirsasana is a journey. There will be days it feels easy and days it feels hard. Consistency in Headstand preparation and focus on Headstand alignment and Headstand safety are your best guides.
Interpreting Common Mistakes
When learning Headstand, people often make similar mistakes. Knowing them helps you fix them. This relates to Headstand alignment.
- Elbows Too Wide: If your elbows are wider than shoulder-width, your base is weak. This puts more pressure on your head and makes you unstable. Fix: Measure your elbow distance carefully (grab opposite upper arms) and keep pressing your fore forearms and elbows into the mat.
- Weight on Neck/Forehead: If you feel heavy on your head or pressure on your forehead or back of your head, you are not using your arms enough. Fix: Push down strongly through your forearms and wrists. Imagine trying to lift your head off the mat using only your arms and shoulders. This action lifts weight off your neck.
- Curved Back (Piked or Arched): If your hips are too far back (piked shape) or your lower back is arching too much, you are not stacked straight. This uses more effort and can strain your back. Fix: Engage your core. Think of pulling your belly button towards your spine. Use the wall to feel the straight line. In the entry steps, walk your feet closer until your hips are stacked over your shoulders before trying to lift your legs.
- Bent Legs (When Trying for Straight): Sometimes people hang out with bent legs because it feels easier. But straight, active legs help with balance and alignment. Fix: Once up, actively straighten your legs. Engage your thigh muscles. Point your toes towards the sky. If you can’t straighten them yet, keep practicing the tuck shape at the wall. Building headstand strength will help.
- Holding Breath: People sometimes hold their breath when concentrating. This makes the body stiff and makes it harder to stay calm. Fix: Try to breathe smoothly and evenly throughout the pose.
Fixing these common issues makes your Headstand stronger, safer, and more comfortable. It improves your Headstand alignment greatly.
Building Your Practice: Beyond the Wall
Once you feel very stable and comfortable against the wall, you might start trying to find balance away from it.
- Practice Floating Away: While at the wall, gently push off the wall with your heels for just a second. See if you can find balance. Put your heels back on the wall. Do this many times.
- Move Away Gradually: Move your mat a little further from the wall. When you go up, your feet might not reach the wall at first. If you wobble, the wall is still there to catch you.
- Have a Spotter: Ask an experienced yoga teacher or friend to spot you when you first try away from the wall. They can stand close by and help if you start to fall.
- Try in the Center (Small Steps): When you feel ready, try coming up in the middle of the room. Keep the Headstand pose steps the same: forearms down, head down, walk feet close, lift one leg or tuck both knees. If you feel unsteady, tuck your knees back to your chest and lower down slowly. It’s okay if you don’t get up fully the first few times (or the first 50 times!).
Remember, mastering Sirsasana is a process of Building headstand strength, improving Headstand alignment, and practicing Headstand safety over time. Be patient and kind to yourself.
Table: Quick Check – Ready or Not?
| Checkpoint | Are You Ready? (Yes/No) | Why It Matters |
|---|---|---|
| No Neck Pain/Injury | Essential: No. | Puts unsafe pressure on a weak area. |
| No High Blood Pressure/Heart Issues | Essential: No (unless cleared by doctor). | Can cause unsafe changes in blood flow/pressure. |
| No Eye Issues (Glaucoma, etc.) | Essential: No (unless cleared by doctor). | Pressure changes can harm eyes. |
| Can Hold Forearm Plank (30+ sec) | Important: Yes. | Shows basic core and shoulder strength. Helps Building headstand strength. |
| Can Hold Dolphin Pose (30+ sec) | Important: Yes. | Builds specific shoulder strength and gets you used to position. |
| Can Walk Feet Close in Dolphin | Important: Yes. | Shows readiness for lifting hips over shoulders. |
| Have a Wall or Spotter Available | Highly Recommended: Yes (especially when learning). | Provides Headstand safety and support. Helps Supported headstand. |
| Feel Calm and Focused | Helpful: Yes. | Doing inversions when stressed can be harder and riskier. |
| Understand Forearm/Head Placement | Essential: Yes. | Key for Headstand alignment and avoiding neck pressure. |
Using this table can help you decide if today is a good day to practice Headstand or to stick with Headstand preparation.
Deciphering What Your Body Tells You
Learning any challenging yoga pose means listening closely to your body. This is part of Headstand safety.
- Pain vs. Effort: Learn the difference. Effort feels like muscles working. Pain feels sharp, pinching, or wrong. If it is pain, stop.
- Dizziness: Feeling a little different after coming down is normal. Feeling very dizzy during the pose might mean you need more Headstand preparation or that it’s not the pose for you right now.
- Shaking: Some shaking is okay, it means muscles are working! But if you are shaking a lot and feel unstable, it might be a sign you need more strength (Building headstand strength) or should come down.
- Neck Feeling Strained: This is a big warning sign. If your neck feels like it’s holding weight or hurting, you must come down slowly. Recheck your Headstand alignment and make sure you are pushing through your forearms.
Being aware of these signals keeps you safe while you explore Yoga inversion poses.
Grasping the Practice
Learning Sirsasana is more than just getting your legs up. It’s about the process.
- Consistency: Short, regular practice is better than long, rare practice. Try working on Headstand preparation a few times a week.
- Patience: It takes time to build strength and feel comfortable upside down. Don’t compare yourself to others.
- Fun: Enjoy the journey! Finding new strength and balance can be fun.
By focusing on Headstand preparation, following the Headstand pose steps carefully, paying close attention to Headstand alignment and always prioritizing Headstand safety, you can slowly and surely work towards Sirsasana. Remember the Headstand contraindications and know when not to try. Building headstand strength is key, often done through other poses like Dolphin. Using a wall for Supported headstand is a smart start.
Frequently Asked Questions (FAQ)
h4: How long should I stay in Headstand?
When you first start, maybe only 10-15 seconds against the wall. As you get stronger and more comfortable, you can stay longer, maybe up to a minute or two. Listen to your body. It’s better to hold it with good form for a short time than bad form for longer.
h4: My neck hurts when I try Headstand preparation. What should I do?
This is a sign you might be putting too much weight on your head or lack the necessary shoulder/core strength. Go back to strengthening poses like Forearm Plank and Dolphin. Focus only on pushing down through your forearms and lifting your shoulders away from your ears in these poses. Make sure you are using the very crown of your head (the flat top). If pain continues even in preparation, see a doctor or physical therapist.
h4: Is it okay to use a pad or blanket under my head?
Yes, a folded blanket or a special headstand pad can add comfort. Just make sure it is firm enough that your base feels stable, not wobbly. Use a yoga mat under the blanket for grip.
h4: I’m afraid of falling. How can I get over this?
Fear is normal! Using a wall is the best way to feel safe. Practice getting up and down slowly near the wall many times. Build confidence there. You can also place pillows around you, although the wall is the most effective safety measure. A spotter can also help ease fear.
h4: How often should I practice Headstand preparation?
Practicing poses like Dolphin, Forearm Plank, and Downward Dog 3-4 times a week will help build the needed strength and comfort with being upside down. You can try the actual Headstand steps (at the wall!) maybe 2-3 times a week, always listening to your body and resting if needed.
h4: What should I do right after Headstand?
Always rest in Child’s Pose (Balasana) for at least as long as you were in Headstand. This helps your body and blood pressure return to normal gently. Do not stand up fast.
Bringing it All Together
Learning Sirsasana, the yoga Headstand, is a rewarding goal. It requires respect for your body, consistent Headstand preparation, careful attention to the Headstand pose steps, focus on proper Headstand alignment, and a deep commitment to Headstand safety. Understand the Headstand contraindications and know when to avoid the pose. Build Building headstand strength through other poses first, and rely on Supported headstand at a wall when learning.
By following this easy guide and putting safety first, you can explore the world of Yoga inversion poses and maybe, in time, find yourself comfortably balanced upside down. Be patient, be safe, and enjoy the process!