
Yes, you absolutely can begin yoga at home! Many people start their yoga journey right in their own living room. This guide will show you how to get started the right way, covering everything from setting up your space to learning simple poses and breathing. Starting yoga at home is a great way to build strength, become more flexible, and find calm. You can go at your own speed and feel comfortable in your own space.
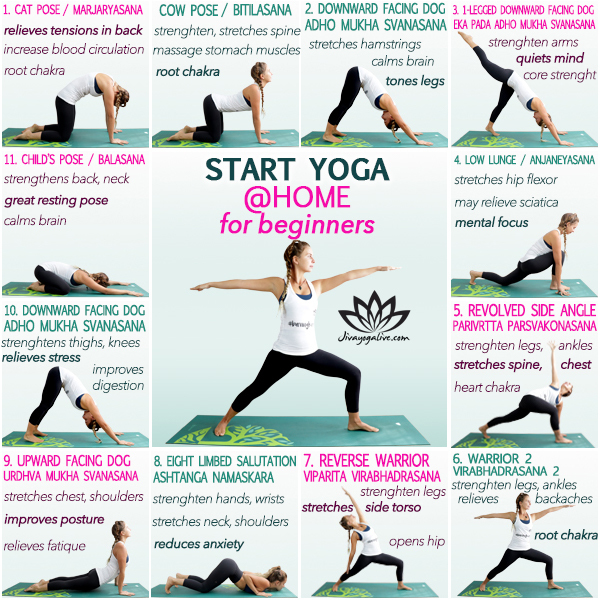
Image Source: jivayogalive.com
Why Start Yoga at Home? Finding Your Calm Space
Starting yoga benefits your mind and body in many ways. You might feel stronger. Your body might move more easily. Yoga helps calm your mind too. When you practice at home, you make your own schedule. No need to rush to a studio. You save time. You save money. Your space is your space. You feel safe there. This makes it easier to focus.
Yoga is for everyone. It does not matter how old you are. It does not matter how your body looks. You do not need to be flexible to start. Yoga helps you get more flexible over time. It helps build muscle. It helps you feel better in your own skin.
Practicing at home lets you explore. You can try different styles. You can take breaks when you need them. It is your path. You choose how it goes.
Setting Up Your Spot: Home Yoga Setup Basics
Your home yoga setup does not need to be fancy. You just need a little space. Find a spot where you can move easily. Make sure you can stretch your arms out. Make sure you can lie down flat. A quiet corner is best. This helps you focus.
Good places could be:
* A corner of your living room.
* A clear spot in your bedroom.
* Even a patio if the weather is nice.
Try to find a place with a flat floor. A hard floor is better than deep carpet. This helps you balance. Make sure the space is clean. You will be close to the floor.
Think about the light. Soft, natural light is nice. Bright, harsh lights can be hard on your eyes. Candles or soft lamps can make the space feel calm.
What about sound? Some people like quiet. Some like soft music. Find what helps you feel peaceful. Turn off your phone if you can. Let others in your home know you need quiet time.
The Right Gear: Getting a Yoga Mat
The most important thing for your home practice is a yoga mat. A yoga mat for home practice keeps you from slipping. It makes hard floors softer for your body. This helps your knees. It helps your hands. It gives you a clean space to practice on.
What kind of mat should you get?
* Thickness: Mats come in different thicknesses. Thicker mats (about 5-6mm) are softer on your joints. This is good if you have knee issues. Thinner mats (about 3-4mm) help you feel the floor more. This can help with balance poses. For starting out, a standard mat (around 4-6mm) is usually good.
* Material: Most mats are made of PVC. These are strong and give good grip. Some mats are made from rubber or TPE. These are often more friendly to the Earth. They also offer good grip.
* Grip: Grip is very important. You do not want your hands or feet to slide. Read reviews to see what people say about the mat’s grip.
You do not need the most expensive mat. A simple, good quality mat is fine for starting. Find one that feels good to you. Pick a color you like.
How to care for your mat:
* Wipe it down after you practice. Use a gentle spray or just water.
* Let it dry fully before you roll it up.
* Store it rolled up. Keep it out of direct sun.
Your First Steps: Basic Yoga Poses
Let’s look at some basic yoga poses. These are good to start with. They help you feel your body. They help you learn balance. They help you stretch gently. Remember to breathe in each pose. Move slowly. Do not push too hard.
Here are some simple yoga poses for beginners:
h4. Easy Pose (Sukhasana)
- Sit on the floor.
- Cross your legs in front of you.
- Put a cushion or folded blanket under your bottom if it helps you sit up tall.
- Rest your hands on your knees.
- Sit up straight. Imagine a string pulling the top of your head to the sky.
- Close your eyes or look softly in front of you.
- Just breathe here. Feel yourself sitting.
This pose is simple. It helps you find your center. It is good for starting and ending your practice.
h4. Mountain Pose (Tadasana)
- Stand tall.
- Put your feet hip-width apart or closer together.
- Feel your feet on the ground. Spread your toes.
- Let your arms hang down by your sides. Palms can face forward.
- Lift your chest gently.
- Roll your shoulders back and down.
- Stand tall like a mountain. Feel strong and steady.
- Breathe here. Feel your posture.
Mountain pose looks simple. But it is key. It teaches you how to stand with good posture. It is the base for many standing poses.
h4. Downward-Facing Dog (Adho Mukha Svanasana)
- Start on your hands and knees.
- Put your hands a little in front of your shoulders. Spread your fingers wide.
- Tuck your toes under.
- Lift your hips up and back.
- Make your body like an upside-down ‘V’.
- Your arms should be straight. Your legs can be bent at the knees, especially at first.
- Let your head hang freely.
- Press your hands into the mat.
- Send your hips high.
- Breathe deeply here. You might feel a stretch in your legs and shoulders.
Downward dog is a common pose. It stretches your whole back body. It builds strength in your arms and legs. It also helps calm the mind.
h4. Child’s Pose (Balasana)
- Start on your hands and knees.
- Bring your big toes to touch.
- Open your knees wide, or keep them close together.
- Sit your hips back onto your heels.
- Lower your upper body down between your thighs.
- Rest your forehead on the mat.
- Stretch your arms out in front of you, or bring them back by your sides.
- Let your body feel heavy. Let go of tension.
- Breathe deeply into your back.
Child’s pose is a resting pose. You can come to it anytime you need a break. It is safe and comforting. It helps you reconnect with your breath.
h4. Cobra Pose (Bhujangasana)
- Lie flat on your belly.
- Put your hands under your shoulders. Fingers point forward.
- Keep your elbows close to your body.
- Press your feet and hips into the mat.
- On a breath in, gently lift your chest off the floor.
- Use your back muscles more than your hands. Your lift might be small. That is okay.
- Keep your neck long. Look slightly forward.
- Keep your shoulders relaxed and down.
- Breathe here. Feel a gentle backbend.
- On a breath out, lower back down.
Cobra pose is a gentle backbend. It helps make your spine more flexible. It strengthens your back muscles.
These are just a few basic poses. There are many more. Start slow. Learn to do these few well.
Putting Poses Together: A Beginner Yoga Sequence
Once you know a few poses, you can link them together. This is called a sequence. A simple beginner yoga sequence helps you move your body gently. It helps you learn how poses flow from one to another.
Here is a very simple sequence you can try at home:
- Start in Easy Pose (Sukhasana): Sit quietly for a few minutes. Focus on your breath.
- Move to Tabletop (on hands and knees): Hands under shoulders, knees under hips.
- Cat-Cow Pose (Marjaryasana to Bitilasana): From tabletop, on a breath out, round your back (Cat). On a breath in, arch your back (Cow). Do this several times with your breath.
- Move to Downward-Facing Dog (Adho Mukha Svanasana): From tabletop, lift your hips up and back. Stay for 5 breaths.
- Move back to Tabletop: Come down onto your hands and knees.
- Move to Child’s Pose (Balasana): Rest here for 5 breaths.
- Come back up to Tabletop.
- Do Cat-Cow again for a few rounds.
- Move to Downward-Facing Dog again. Stay for 5 breaths.
- Walk your hands back towards your feet to stand up (or walk your feet forward to your hands).
- Stand in Mountain Pose (Tadasana): Feel grounded for a few breaths.
- Rest in Easy Pose (Sukhasana) or lie down flat (Savasana, or Corpse Pose – just lie flat on your back, arms by your sides, let everything relax). Stay here for 5-10 minutes.
This is a very short sequence. You can make it longer as you learn more poses. The key is to move with your breath.
Finding Guidance: Free Home Yoga Videos
You do not need a teacher right next to you to start. There are many free home yoga videos online. These videos can guide you through poses and sequences. They are great for beginners.
Where to find them:
* YouTube: Many yoga teachers and studios have free videos. Search for “beginner yoga,” “gentle yoga,” or “yoga for flexibility.”
* Yoga Apps: Some apps offer free beginner classes.
* Websites: Some yoga websites have free videos or guides.
Tips for using videos:
* Find a teacher you like: Look for someone whose voice is calm and clear. Someone who explains things well.
* Start with short videos: Look for videos that are 15-30 minutes long.
* Read comments: See what other beginners say about the video.
* Do not worry about doing it perfectly: Just try your best. Listen to your body.
Using videos helps you learn the names of poses. It shows you how the poses should look. It helps you time your practice.
Breathing Matters: Yoga Breathing Techniques
Yoga is not just about poses. It is also about breathing. How you breathe can change how you feel. It can help you stay calm. It can help you focus. It can help you move more easily in poses. These are called yoga breathing techniques.
h4. Just Noticing Your Breath
- Sit or lie down in a comfortable spot.
- Close your eyes.
- Just pay attention to your breath.
- Do not try to change it. Just notice it.
- Where do you feel it? In your belly? In your chest?
- Is it fast or slow? Deep or shallow?
- Just watch your breath like you are watching clouds float by.
This simple practice helps you become aware of your breath. This awareness is the first step.
h4. Deep Belly Breathing (Dirga Pranayama – Three-Part Breath)
This breath fills your belly, then your ribs, then your chest.
- Sit or lie down. Put one hand on your belly, one on your chest.
- Breathe in slowly through your nose. Feel your belly rise under your hand. Fill up your lower lungs.
- Keep breathing in. Feel your ribs expand to the sides. Fill up your middle lungs.
- Keep breathing in. Feel your upper chest rise a little. Fill up your upper lungs.
- Breathe out slowly through your nose. Feel your chest fall. Then your ribs. Then your belly gently falls in.
- Empty all the air out.
- Repeat this slow, full breath several times.
This breath is calming. It helps you take fuller breaths. It brings more oxygen into your body.
h4. Ocean Breath (Ujjayi Breath)
This breath sounds like soft ocean waves.
- Sit comfortably.
- Breathe in and out through your nose.
- Try to make a soft sound at the back of your throat as you breathe out. Like fogging up a mirror, but with your mouth closed.
- Then, try to make the same soft sound as you breathe in.
- It is a gentle squeezing at the back of your throat.
- Make the inhale and exhale the same length.
This breath helps you create a rhythm. It can be used during your yoga poses. The sound helps you focus. It is warming for the body.
Practice breathing techniques on their own. Then try to use them during your poses. Your breath is your guide.
Getting Extra Help: Beginner Yoga Props
Yoga props are tools. They can help you get deeper into a pose. They can help you feel more comfortable. They can help you learn the right shape of a pose. You do not need them to start, but they can be helpful beginner yoga props.
Common props:
- Yoga Blocks: These are usually made of foam or cork. You can place them under your hands in poses like Downward Dog (if your hands do not reach the floor). You can sit on them in Easy Pose to lift your hips. They bring the floor closer to you.
- Yoga Strap: This is a long piece of fabric. You can use it to reach your feet in stretching poses (like sitting forward folds) if you cannot touch them with your hands. It helps extend your reach.
- Blankets: A folded blanket can cushion your knees in poses on your hands and knees. It can also help you sit more comfortably.
- Bolster: This is a firm pillow. You can use it in resting poses. It supports your body. It helps you relax more deeply.
You can use things you already have at home as props.
* Use thick books instead of blocks.
* Use a belt or towel instead of a strap.
* Use regular blankets or pillows.
Props are not a sign that you are not good enough. They are tools to help you practice safely and comfortably. They help your body learn the pose shape without strain.
Keeping It Safe: Safe Home Yoga Practice
Practicing at home means you are your own teacher. This is great, but it means you need to be careful. A safe home yoga practice is key to enjoying it and not getting hurt.
Tips for safety:
* Listen to your body: This is the most important rule. If something hurts, stop. Pain is your body’s way of saying something is wrong. It is okay to not do a pose fully. It is okay to skip a pose.
* Do not push too hard: Flexibility and strength come over time. Do not try to force your body into shapes it is not ready for.
* Warm up: Start with gentle movements. Do not go straight into deep stretches. Simple movements like Cat-Cow or gentle twists are good warm-ups.
* Use props if you need them: They help you practice safely.
* Be mindful of your space: Make sure there are no things you can trip over. Make sure your mat does not slip.
* Follow good teachers (if using videos): Choose videos from teachers who explain poses well and offer ways to make them easier or harder.
* Know when to rest: If you feel tired or out of breath, take a break in Child’s Pose.
* Cool down: End your practice with gentle stretches or lying flat for a few minutes (Savasana).
Yoga should feel good. It should not be a competition. Your body is unique. Be kind to it.
Building a Habit: Making Yoga Part of Your Life
Starting is one thing. Sticking with it is another. Making yoga a habit at home can be easy if you plan a little.
- Start small: Even 15-20 minutes a few times a week is great. Do not feel like you need to practice for an hour every day.
- Schedule it: Put your yoga time in your calendar. Treat it like any other important meeting.
- Find your best time: Are you a morning person? Try yoga when you wake up. Do you need to de-stress after work? Practice in the evening.
- Have your space ready: Keep your mat rolled out or easy to get to.
- Vary your practice: Try different videos or sequences so you do not get bored. One day focus on stretching, another on strength.
- Be patient: See small changes over time. It is a journey.
- Celebrate small wins: Notice how you feel after practice. Feel good about showing up for yourself.
Wrapping Up Your First Steps
Starting yoga at home is a wonderful step towards feeling better in your body and mind. You have learned about setting up your space, getting a yoga mat for home practice, trying basic yoga poses, following a beginner yoga sequence, using yoga breathing techniques, helpful beginner yoga props, and how to have a safe home yoga practice.
Remember to be kind to yourself. Everyone starts somewhere. Just step onto your mat. Breathe. Move. Enjoy this new journey.
Frequently Asked Questions
h4. How long should a beginner yoga session be at home?
Start with 15-20 minutes. This is enough to get moving and breathing. As you feel more comfortable, you can make your practice longer.
h4. Do I need special clothes for home yoga?
No, you do not need special clothes. Wear clothes that you can move freely in. Stretchy pants, shorts, and a comfortable top are good choices. Make sure they do not get in your way.
h4. Can I eat before doing yoga?
It is best to practice yoga on an empty stomach. Or wait at least 1-2 hours after a light meal. A full stomach can feel uncomfortable in many poses. If you need something, have a small piece of fruit or a few nuts about 30 minutes before.
h4. What if I’m not flexible at all?
That is completely fine! Many people start yoga with very little flexibility. Yoga helps you become more flexible over time. Just do what feels right for your body today. Never force a stretch. Focus on breathing and gentle movement.
h4. How often should I practice?
Aim for 2-3 times a week to start. Being consistent is more important than practicing for a long time. Even short, regular practices will bring benefits. If you can practice every day, even for just 10-15 minutes, that is great too. Find what works for your life.
h4. Is it okay to use free home yoga videos?
Yes, free home yoga videos are great for beginners. They give you a way to learn poses and sequences with guidance. Just make sure the teacher seems clear and safe. Follow their cues carefully.
h4. What is the best yoga mat for home practice?
A good yoga mat for home practice offers grip and some cushion. Look for one around 4-6mm thick. Read reviews about grip. You do not need the most expensive one to start.
h4. How do I know if I’m doing a pose right without a teacher?
This is where following videos carefully helps. Watch the teacher. Listen to their instructions. Try to feel the pose in your body. If you feel pain, stop. Look up photos or descriptions of basic yoga poses online to check your shape. Remember, perfect is not the goal, safe movement is.
h4. Should I use beginner yoga props right away?
You can! If you feel a pose is hard to reach or uncomfortable, try using a prop. Blocks can help bring the floor closer. A blanket can pad your knees. They are there to help you.
h4. What are the best yoga poses for beginners?
Start with basic yoga poses like Easy Pose, Mountain Pose, Downward Dog, Child’s Pose, and Cobra. Sun Salutations are also common beginner yoga sequences. Focus on learning a few poses well before trying too many new ones.