
Getting into a headstand in yoga, also known as Sirsasana, is a big goal for many people. It is a powerful pose. It can feel scary at first. Learning how to get into headstand safely is very important. This pose needs strength and balance. It also needs practice. It is not a pose to rush into. You need to get your body ready first. Doing it the right way keeps you safe. We will cover the steps and tips for beginners.
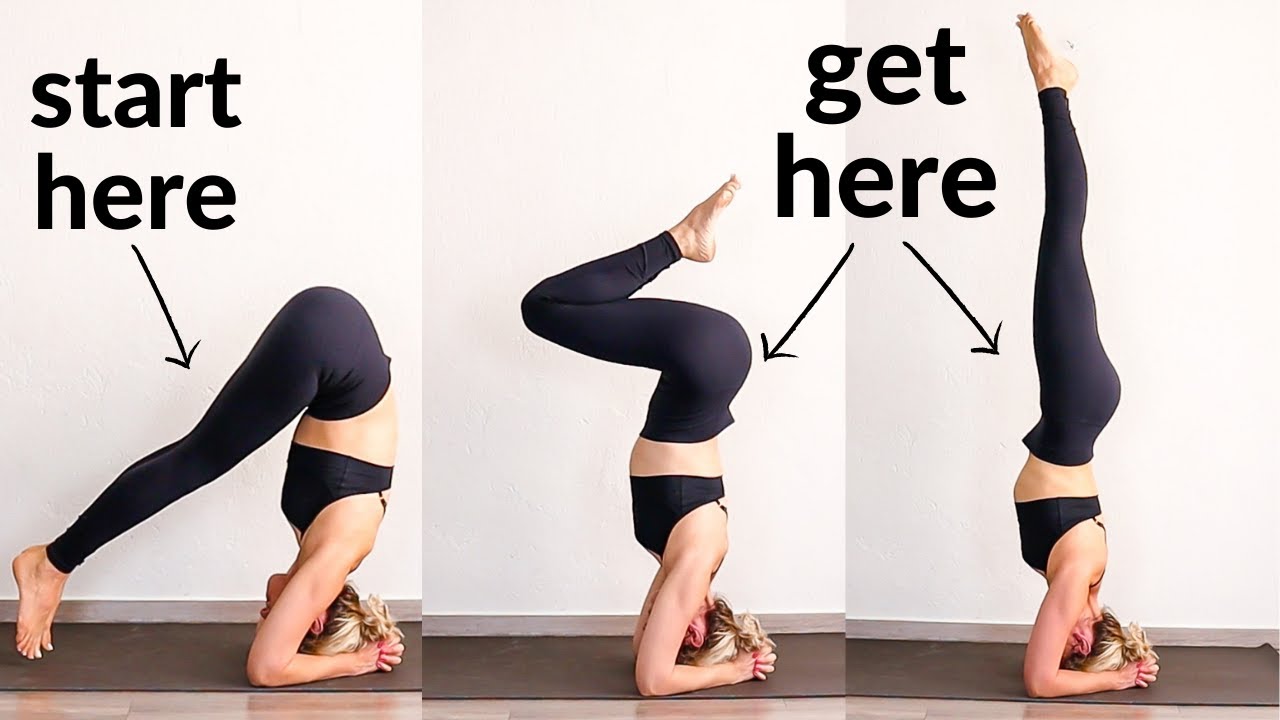
Image Source: i.ytimg.com
Fathoming Headstand Yoga (Sirsasana)
Headstand is often called the “king” of yoga poses. It is an inversion. This means your head is lower than your heart. Sirsasana is the Sanskrit name. It is a strong pose for the whole body. It works your arms, shoulders, back, and belly muscles. It also tests your balance. Doing it right takes time and patience. Do not worry if you cannot do it right away. It is a journey.
Grasping Why People Do Headstand Yoga
People do headstand for many reasons. There are many benefits of headstand yoga. These benefits can help your body and your mind. But remember, you should always listen to your body. Only do this pose if it feels right for you.
Gains for Your Body
- More blood flow: When you are upside down, blood flows more easily to your head. Some people say this helps wake up the brain. It might help you feel more alert.
- Stronger muscles: Headstand works many muscles. Your arms and shoulders hold you up. Your core strength for headstand is key. Your belly muscles work hard to keep you straight. Your neck muscles get stronger too, but be careful with your neck.
- Better balance: This pose is all about finding your center. Practicing it helps your body learn how to balance in new ways. This can help your balance in other poses and in daily life.
- Helps your spine: Inversions can help decompress your spine. This means taking pressure off the discs between your bones.
- Might help digestion: Some people say being upside down helps move things through your body better.
Gains for Your Mind
- Builds confidence: Learning a hard pose like headstand feels really good. It shows you that you can do things you thought were impossible. This builds confidence.
- Calms the mind: Focusing on balance and your breath can help quiet your thoughts. It makes you be fully present.
- Changes your view: Seeing the world upside down is a new way to look at things. It can help you shift your perspective on challenges.
- Reduces stress: Like many yoga poses, headstand can help release tension. It can make you feel calmer after practicing.
Recognizing When Not to Do Headstand
Headstand is not for everyone. There are times when you should not do this pose. These are called headstand contraindications. It is very important to know these before you try the pose. Doing headstand when you should not can be dangerous.
- Neck problems: If you have any pain or injury in your neck, do not do headstand. Your neck holds weight in this pose. It needs to be healthy.
- High blood pressure: Going upside down can raise your blood pressure more. If yours is already high, this can be risky.
- Heart conditions: If you have heart problems, talk to your doctor before trying inversions.
- Eye problems: Conditions like glaucoma or detached retina can be made worse by the pressure of inversions.
- Headache or migraine: Doing headstand with a headache will likely make it worse.
- Menstruation: Some yoga styles advise against inversions during your period. Listen to your body.
- Pregnancy: If you are pregnant, it is best to avoid headstand unless you did it regularly before pregnancy and have guidance from a teacher.
- Ear infection: Changes in pressure can affect your ears.
- Vertigo: If you feel dizzy easily, inversions can make it worse.
- Recent injury or surgery: If you have had recent injuries, especially to the head, neck, shoulders, or back, wait until you are fully healed.
Always talk to a doctor or a qualified yoga teacher if you are unsure. Safety is the most important thing.
Getting Your Body Ready: Headstand Preparation Poses
You cannot just jump into headstand. You need to get your body ready. This means building strength and getting used to being upside down a little bit. Headstand preparation poses help you do this. They build strength in your arms, shoulders, and core. They also help you feel more comfortable being upside down.
Here are some poses that help get you ready:
-
Dolphin Pose: This pose is great for building arm and shoulder strength. It also helps you feel the weight shift towards your head and arms.
- Start on your hands and knees.
- Put your elbows down on the mat. They should be under your shoulders.
- Place your hands together or keep them apart.
- Lift your hips up high. Your body makes an A shape.
- Press down through your forearms and hands.
- Keep your neck relaxed. Look back at your feet or legs.
- Hold for a few breaths.
- This pose is like a Downward Dog on your forearms.
-
Forearm Plank: This builds serious core strength. Remember, core strength for headstand is crucial.
- Start on your hands and knees.
- Put your elbows down under your shoulders.
- Extend your legs back.
- Your body should be in a straight line from your head to your heels.
- Squeeze your belly muscles tight. Do not let your hips drop or stick up.
- Hold for as long as you can. Rest, then do it again.
-
Dolphin Plank: This mixes Dolphin pose and Forearm Plank.
- Start in Dolphin Pose.
- Shift your weight forward. Your shoulders move over your elbows.
- Keep your body in a straight line, like in Forearm Plank.
- Squeeze your core.
- Then push back to Dolphin Pose.
- Move back and forth slowly. This builds strength and control.
-
Downward-Facing Dog (Adho Mukha Svanasana): This pose builds arm and shoulder strength. It also gets your wrists ready. It is a basic yoga pose that is good for everything.
- Start on hands and knees.
- Tuck your toes.
- Lift your hips up and back.
- Make an A shape with your body.
- Press down through your hands and fingers.
- Let your head hang.
- You can bend your knees if your hamstrings are tight.
-
Puppy Pose (Uttana Shishosana): This pose stretches your shoulders and back. Good shoulder flexibility is helpful for headstand.
- Start on hands and knees.
- Walk your hands forward.
- Keep your hips over your knees.
- Lower your chest towards the floor.
- Rest your forehead on the mat.
- Keep your arms active and reaching forward.
-
Child’s Pose (Balasana): This is a resting pose. You can use it between preparation poses. It is also good to do after trying headstand.
- Kneel on the floor.
- Touch your big toes together.
- Separate your knees wide or keep them together.
- Sit back on your heels.
- Fold forward.
- Rest your torso between your thighs.
- Rest your forehead on the mat.
- Let your arms rest beside your body or reach them forward.
Practicing these poses regularly will make you stronger and more ready for headstand. Do not skip the prep work!
Building Your Base: Core Strength for Headstand
Core strength is super important for headstand. Your core muscles are like the center power house of your body. They include your belly muscles, your back muscles, and your hip muscles.
Why is the core so important for headstand?
- Stability: A strong core helps keep your body straight and steady when you are upside down. Without it, you might wobble or banana shape.
- Lifting: Your core helps you lift your legs up into the pose. It also helps you control how you go up and down.
- Spine Safety: A strong core supports your spine. This takes some pressure off your neck. It helps you hold the pose safely.
How to build core strength for headstand:
- Plank Pose: Hold plank for longer times.
- Forearm Plank: As mentioned before, this is very good.
- Boat Pose (Paripurna Navasana): This pose works your deep belly muscles.
- Sit on the floor with knees bent.
- Lean back slightly.
- Lift your feet off the floor.
- You can keep knees bent or straighten legs.
- Reach your arms forward or hold your legs.
- Keep your back straight, not rounded.
- Feel your belly muscles working.
- Leg Lifts: Lie on your back. Keep legs straight. Lift and lower legs slowly using your belly muscles.
- Crunches: Basic crunches help build upper belly strength.
- Twists: Poses like Seated Twist (Ardha Matsyendrasana) or Revolved Chair Pose (Parivrtta Utkatasana) help work the side of your core.
Make core work a part of your regular practice. A strong core is your best friend in headstand.
The Wall is Your Friend: Headstand Yoga Against Wall
When you first start, using a wall is a great idea. Headstand yoga against wall gives you support. It helps you learn the feeling of being upside down without fear of falling over. The wall catches you if you lose balance.
How to practice headstand against the wall:
- Set up: Find a clear wall space. Fold your yoga mat or use a blanket to cushion your head. Place the mat right against the wall.
- Measure: Kneel down with your knees close to the wall. Place your forearms on the mat in front of you. Your elbows should be under your shoulders. Your hands can be clasped or flat. The distance between your elbows should be about the width of your shoulders. Mark this spot with your elbows.
- Place your head: Put the crown of your head on the mat between your hands. Your hands support the back of your head. Your forearms press down firmly. Your neck should be straight, not bent forward or back too much. Imagine balancing a book on your head.
- Lift your hips: Tuck your toes under. Lift your hips up into Dolphin Pose.
- Walk your feet in: Slowly walk your feet towards your head. Keep your hips lifting high. Walk them in as close as you can. This stacks your hips over your shoulders.
- Lift one leg: Bend one knee and draw it towards your chest. Feel your core engage. Lighten the weight on the other foot.
- Kick up gently (or hop): From here, you can do a small hop with the other leg. Or you can try lifting the first bent leg straight up first, and then lifting the second leg to meet it. Do not kick hard! Kicking hard can lead to falling or hurting your neck.
- Find the wall: Your feet will likely land on the wall. Great! Use the wall for support.
- Find your balance: Try to take a little weight off the wall. Engage your core. Squeeze your legs together. Point your toes up. Find stillness.
- Come down: This is important. Bend your knees. Bring your feet slowly back down to the wall. Then lower your feet to the floor one at a time. Rest in Child’s Pose.
Practicing against the wall helps you get used to the feeling of being upside down. It builds confidence. Do not try to go into the middle of the room until you can hold the pose easily and calmly against the wall.
The Path Up: Sirsasana Steps (Yoga Headstand Tutorial)
Once you feel ready and have practiced against the wall, you can try moving away from it. This is a yoga headstand tutorial focusing on the steps to get into the pose.
Remember to have a clear space. Maybe still have a wall nearby just in case. Or have a friend spot you.
- Prepare your space: Fold your mat or use padding. Make sure the floor is not slippery.
- Measure your base: Kneel down. Place your forearms on the floor. Elbows are shoulder width apart. Hands are clasped together, fingers linked. This forms a triangle with your elbows and hands. Your head will go in the center of this triangle. Press down firmly through your forearms and wrists. This is your base. It must be strong.
- Place your head: Put the top-back of your head (the crown) on the mat, right in the space made by your hands and arms. Your hands support the back of your head. Do not put weight on your forehead or the very back of your head. Find the flat spot on the top. Your neck should be long, not crunched. Keep pressing your forearms down.
- Lift your hips: Tuck your toes under. Lift your hips up into Dolphin pose. Your body is in an A shape.
- Walk your feet in: Walk your feet towards your head. Keep your legs straight if you can. Walk them as close as possible until your hips are stacked over your shoulders. Your back should be straight. You should feel light on your feet now. Most of your weight is on your forearms.
- Lift one leg: Bend one knee and bring it towards your chest. Keep your core tight.
- Lift the second leg (slowly): Engage your core even more. Slowly lift the second leg up to meet the first. Or, if you prefer, lift the first leg straight up, then bring the second leg up to meet it.
- Option 1 (Bent Knees): Bring both knees to your chest, tucked in. You are in a tuck position headstand. This is easier to balance. Straighten legs from here if you feel stable.
- Option 2 (Straight Legs): Lift one leg straight up. Then lift the other leg to meet it, keeping both legs straight as you go up. This needs more hamstring flexibility and core control.
- Straighten your body: Once your legs are up, straighten your body from head to heels. Engage your core, your legs, your buttock muscles. Reach your toes towards the sky. Keep pressing down through your forearms. Do not put too much weight on your head. Most of the work is done by your arms and core.
- Hold the pose: Breathe evenly. Find your balance. Stay for a few breaths, or as long as feels safe. Do not force it.
This step-by-step process is your beginner headstand tips in action. Take it slow. Do not feel like you have to get your legs straight up on the first try. The tuck position is a great place to start and build stability.
Helpful Advice: Beginner Headstand Tips
Doing headstand for the first time can be scary. Here are some beginner headstand tips to help you practice safely and build up to the pose.
- Start with a teacher: If possible, learn headstand from a qualified yoga teacher. They can guide you and check your form.
- Use a wall: As mentioned, the wall is your friend. Do not rush away from it.
- Use padding: Always use a folded mat or blanket under your head to protect your neck and skull.
- Build your base: Make sure your forearms are pressing down strongly. Your elbows should be shoulder-width. This base holds most of your weight, not your head.
- Engage your core: Remember, your belly muscles are key. Pull them in and up. This keeps your body straight.
- Look at one spot: Find a spot on the floor that does not move. Keep your eyes softly focused there. This helps with balance.
- Breathe: Do not hold your breath. Breathe calmly and evenly.
- Listen to your body: If you feel pain in your neck or head, come down right away. This pose should not hurt.
- Practice getting down: Know how to come out of the pose safely before you go up. Practice bringing your knees back down slowly.
- Start small: Do not try to hold the pose for a long time at first. Start with just a few seconds. Build up slowly.
- Use a mirror: Practice near a mirror (but not so close you could fall into it). See if your body is straight.
- Have a spotter: Ask a friend or teacher to stand near you. They can help if you start to fall.
- Patience is key: Do not get frustrated. Headstand takes time and practice. Celebrate small progress. Maybe today you walked your feet closer to your head. That is great!
Bumps in the Road: Common Headstand Mistakes
People often make certain mistakes when learning headstand. Knowing them can help you avoid them. Here are common headstand mistakes:
- Too much weight on the head: This is dangerous for your neck. Your forearms and shoulders should take most of the weight. Press down firmly through your elbows and wrists.
- Elbows too wide: If your elbows are wider than your shoulders, your base is weak. Measure your base carefully. Keep elbows in.
- Kicking up: Kicking up strongly can make you fall or hurt your neck. Try to lift up using your core and control, not force. Walk your feet in close first.
- Curved back (banana shape): This happens when your core is not engaged. Squeeze your belly and buttock muscles. Straighten your body.
- Looking around: Moving your head while in headstand will make you lose balance. Keep your gaze steady.
- Holding breath: This creates tension. Breathe easily.
- Trying too soon: If you do not have enough strength in your arms, shoulders, and core, you are not ready. Build up with prep poses.
- Not using padding: Protecting your head is important.
- Staying up too long early on: Start with short holds to let your body get used to the pose.
Avoiding these common headstand mistakes will make your practice safer and more effective.
Exiting the Pose Gracefully
Coming out of headstand is just as important as getting in. Do it slowly and with control.
- Engage your core.
- Slowly bend your knees towards your chest (tuck position).
- Lower your feet slowly back down to the floor. Try to land softly.
- Once your feet are down, stay on your knees for a moment.
- Move into Child’s Pose (Balasana). Rest your forehead on the mat. Let your arms relax beside your body.
- Stay in Child’s Pose for several breaths, or even a minute or two. This helps your body adjust to being right side up again. It helps blood flow return to normal gently.
Do not stand up right away after headstand. You might feel dizzy.
Recovering After Headstand
After headstand and Child’s Pose, do some gentle movements.
- Neck rolls: Slowly roll your head from side to side. Release any tension in your neck.
- Shoulder rolls: Roll your shoulders forwards and backwards.
- Downward Dog: This can feel good after inversion.
- Sitting: Just sitting quietly for a moment is fine too.
Give your body time to recover before doing any other hard poses.
The Practice Journey
Learning headstand is a process. It takes time. It takes regular practice. Do not get discouraged if you do not get it right away. Everyone starts as a beginner.
- Practice your preparation poses often.
- Work on your core strength for headstand.
- Spend time at the wall. Get comfortable being upside down.
- Try lifting one leg, then both knees tucked, then maybe straightening legs.
- Be patient with yourself.
- Listen to your body.
- Celebrate every little step forward.
Maybe today you just held Dolphin longer. That is great progress! Maybe next week you lift one foot off the floor slightly at the wall. That is also great! Focus on the process, not just the final pose.
Headstand is a wonderful pose with many benefits. But safety is the most important thing. By preparing properly, using the wall, learning the steps carefully, and being patient, you can work towards doing headstand yoga beginner style and beyond. Enjoy the journey!
Frequently Asked Questions (FAQ)
Can I learn headstand on my own?
It is best to learn headstand from a qualified yoga teacher if you can. They can help you with your form and make sure you are doing it safely. If you are learning on your own, use a wall and follow steps very carefully. Have a soft surface and maybe a friend to help spot you.
How long does it take to learn headstand?
It is different for everyone. Some people might get it in a few weeks. For others, it might take months or even longer. It depends on your current strength, flexibility, and how often you practice. Do not compare yourself to others. Just keep practicing safely.
How long should I hold headstand?
When you start, hold it for just 5-10 seconds. As you get stronger and more comfortable, you can hold it longer. Some people build up to holding it for a minute or even longer. Listen to your body. If you feel tired or unstable, come down.
What if I keep falling?
Falling is part of learning inversions! Try to fall safely towards your back or side. Use a wall to prevent hard falls. Make sure your base (forearms) is strong and your core is engaged. Practice preparation poses more to build strength.
My neck hurts when I try headstand. What am I doing wrong?
Neck pain is a sign you are putting too much weight on your head. Your forearms should be taking most of the weight. Press down firmly through your elbows and wrists. Make sure your base is a strong triangle and your neck is long, not crunched. If pain continues, do not do the pose and talk to a teacher or doctor. You may need to build more shoulder and arm strength first.
Should I clasp my hands or keep them flat?
Most beginners are taught to clasp their hands, creating a cup for the back of the head. This can feel more secure. Some people prefer hands flat (this variation is sometimes called Tripod Headstand, but that has hands on the floor, not forearms). For the forearm stand (Sirsasana), clasped hands are common for beginners. Try both carefully to see what feels more stable for your body, but clasped hands is the standard way to start Sirsasana.
What poses should I do after headstand?
Child’s Pose is the most important pose right after headstand. Stay there for a while. Then gentle poses like Downward Dog, seated twists, or just sitting quietly are good for recovery.