
Image Source: i.ytimg.com
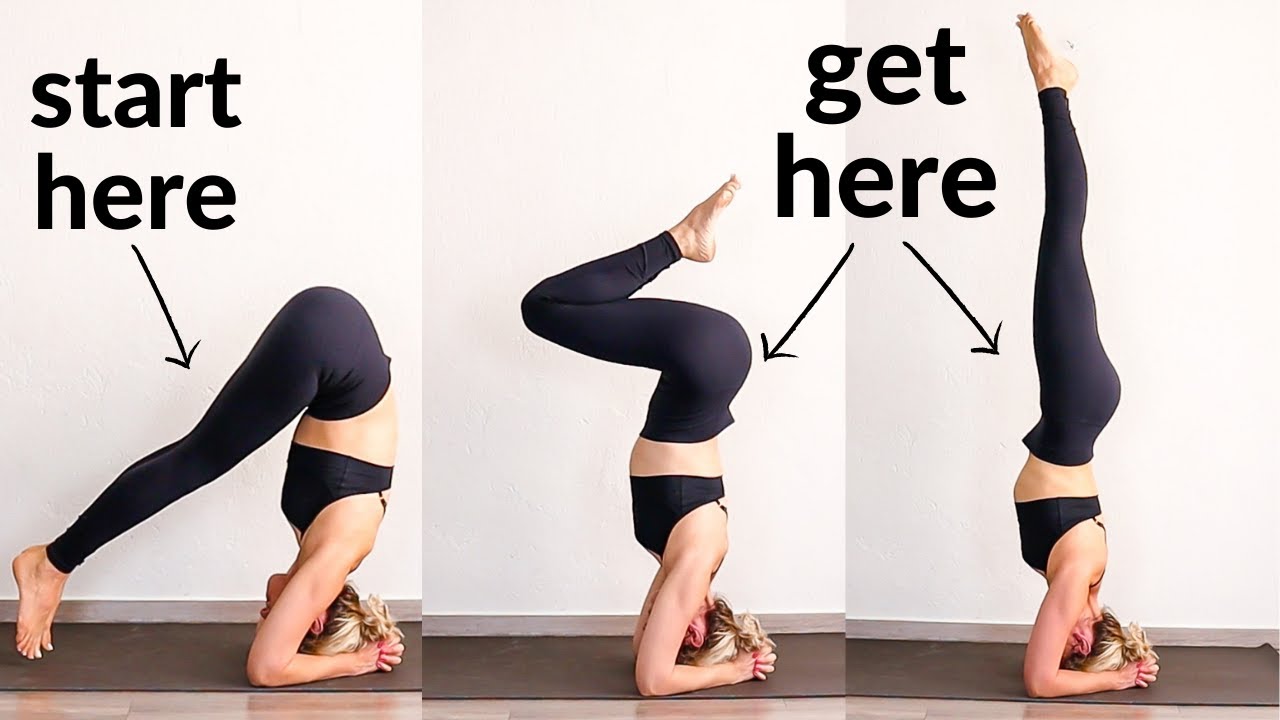
How To Do A Yoga Headstand: A Complete Beginner’s Guide
Yoga headstand, known as Sirsasana, is a well-known yoga pose. It is an inversion, meaning you turn your body upside down. People call it the ‘King of Poses’ because it has many good effects on the body and mind. Can beginners do a headstand? Yes, beginners can learn a headstand. It takes time. It takes practice. It needs careful steps. This guide will show you how to start safely. You will learn the steps needed for a headstand. You will learn how to use support. You will learn how to get your body ready.
What is Sirsasana?
Sirsasana is the Sanskrit name for headstand. It is a pose where you balance on your head and forearms or hands. Your body is straight up in the air. Your feet point to the sky. It is one of the main inversion poses in yoga. Inversions turn your body upside down. This changes blood flow. It can feel strange at first. But it offers many benefits.
Knowing Why You Should Try Headstand (Headstand Benefits)
Why do people do headstand? There are many good reasons. It can help your body and your mind. Here are some of the benefits people talk about:
- Helps blood flow: When you are upside down, blood goes to your head. This can feel nice. Some people say it helps wake up the brain.
- Makes you feel strong: Holding a headstand needs strength. It works your arms. It works your shoulders. It works your core muscles (your belly and back). Doing it helps build this strength.
- Helps you balance: Headstand is all about finding balance. It teaches you how to hold your body steady. This skill helps in other poses too.
- Makes you feel calm: Inversions can calm your nervous system. After a headstand, some people feel relaxed. It can help reduce stress.
- Builds focus: To do a headstand, you must focus. You need to pay attention to your body. You need to ignore fears. This focus helps your mind get stronger.
- Can help digestion: Some people find inversions help move things along in the body. It can be good for your belly.
- Boosts energy: Turning upside down can give you a burst of energy. It wakes you up.
- Helps shoulders and arms: Holding the pose builds strength in your upper body. Your shoulders get stronger. Your arms get stronger.
Remember, these benefits come with safe and regular practice. Do not rush into the pose. Learn it step by step.
Getting Your Body Ready for Headstand (Headstand Preparation)
Headstand needs some strength. It needs flexibility. It needs courage. You should not just jump into it. Getting ready is very important. It helps prevent injuries. It builds the muscles you need. It makes you feel more sure of yourself.
What do you need to get ready?
* Arm and Shoulder Strength: Your arms and shoulders hold a lot of your weight. They need to be strong.
* Core Strength: Your belly and back muscles keep your body straight. They stop you from wobbling. They must be strong.
* Neck Safety: You must put weight on your forearms or hands, not just your neck. Your neck needs to be safe. Prep poses help you learn this.
* Practice Falling Safely: You might fall when learning. It is okay. Learn how to roll out of it. Practice near a wall first.
* Mental Readiness: It can be scary to turn upside down. Practice helps build confidence.
Getting Your Body Ready (Prep Poses)
Doing certain yoga poses helps get you ready for headstand. These poses build strength where you need it. They also help you get used to having your head lower than your heart.
Poses That Build Arm and Shoulder Strength
Dolphin Pose
Dolphin pose is a great pose for headstand prep. It looks a bit like Downward-Facing Dog, but you are on your forearms.
How to do Dolphin Pose:
* Start on your hands and knees.
* Put your forearms on the floor. Your elbows should be under your shoulders.
* Your hands can be flat on the floor. Or you can clasp your hands together. Clasped hands are often used for Supported Headstand. Practice both ways.
* Tuck your toes under.
* Lift your hips up towards the sky.
* Press down into your forearms.
* Let your head hang heavy. Do not rest your head on the floor.
* Your body looks like an upside-down V. Your hips are the highest point.
* Keep your belly pulled in. This works your core.
* Hold the pose for 5-10 breaths. Rest. Do it a few times.
Why Dolphin Pose helps:
* It makes your shoulders strong.
* It makes your arms strong.
* It helps you get used to having weight on your forearms.
* It teaches you to lift your hips high using your core.
Forearm Plank
Forearm stand is a pose too, but Forearm Plank is a better prep. It builds pure core strength.
How to do Forearm Plank:
* Start on your hands and knees.
* Put your forearms on the floor. Your elbows should be under your shoulders.
* Walk your feet back. Make your body straight like a plank of wood.
* Your body should be in one long line. From your head to your heels.
* Do not let your hips drop. Do not lift your hips too high.
* Pull your belly button in towards your spine. Squeeze your belly muscles.
* Press down into your forearms.
* Look slightly forward or at your hands. Keep your neck long.
* Hold for 30 seconds, then longer as you get stronger.
Why Forearm Plank helps:
* It builds strong core muscles. A strong core is a must for balancing in headstand.
* It makes your shoulders and arms work.
* It teaches your body to be straight and strong.
Other Helpful Prep Poses
- Downward-Facing Dog: This pose builds arm and shoulder strength. It also gets you used to having your head below your heart.
- Start on hands and knees.
- Hands shoulder-width apart. Fingers spread wide.
- Tuck toes, lift hips up and back.
- Body is an upside-down V.
- Press hands down. Lengthen your spine.
- Bend knees if your back rounds. You can pedal your feet.
- Plank Pose: Similar to Forearm Plank, but on your hands. Builds arm, shoulder, and core strength.
- Start on hands and knees.
- Hands under shoulders. Fingers spread wide.
- Step feet back. Make your body straight like a plank.
- Engage your core. Look slightly forward.
- Dolphin Pose against the Wall: This helps you feel the weight in your shoulders and arms.
- Do Dolphin Pose but with your feet close to a wall.
- Walk your feet up the wall a little bit. Keep pressing into your forearms. Feel the work in your shoulders. This is like the start of a wall headstand.
Two Ways to Try Headstand
There are different ways to do a headstand. For beginners, two ways are most common:
- Supported Headstand (Sirsasana I): This uses your forearms on the ground. Your hands are clasped together. This forms a strong base with your arms.
- Tripod Headstand (Sirsasana II): This uses your hands on the ground. Your hands and your head make a triangle (a tripod) on the floor.
Both need strength and balance. The Supported Headstand is often taught first. It can feel more stable for some people because the forearms are a wider base. But the Tripod Headstand can also feel right for others. We will look at the steps for both.
How to Do Supported Headstand (Sirsasana I)
This is the classic Supported Headstand. It uses your forearms and clasped hands. It makes a solid base. Using a wall is key when you first learn. It helps you balance. It stops you from falling over.
Using the Wall (Wall Headstand)
Always start practicing Wall headstand. Find a clear wall space. Put your mat against the wall. The narrow end of the mat should touch the wall.
Supported Headstand Steps (with Wall)
Follow these steps carefully. Do not rush. Listen to your body.
- Set Up Your Base: Kneel on the floor. Sit back on your heels. Place your elbows on the floor. Your elbows should be about shoulder-width apart. Check this by holding your opposite elbows with your hands. This is how far apart your elbows should be.
- Clasp Your Hands: Keep your elbows where they are. Bring your hands forward. Clasp your fingers together tightly. Make a cup shape with your hands. Your forearms and clasped hands make a triangle shape on the floor. This is your base.
- Place Your Head: Lower the top of your head to the floor. The back of your head should rest against your clasped hands. It’s important to place the right spot of your head down. Not your forehead. Not the back of your head. It’s the crown, the highest point when you are standing tall. Find that spot. Place that spot on the floor. Make sure the back of your head is supported by your hands.
- Lift Your Hips: Tuck your toes under. Straighten your legs. Lift your hips up towards the ceiling. You are now in a shape like Dolphin Pose, but with your head on the floor and hands clasped.
- Walk Your Feet In: Start walking your feet towards your face. Keep your legs straight if you can. As you walk in, your hips will move more over your shoulders. Walk in as far as you can. Aim to get your hips right over your shoulders.
- Prepare to Lift: Keep pressing down firmly into your forearms and elbows. This is very important. Do not sink into your neck. Your shoulders are doing the work. Keep your core strong. Pull your belly in.
- Lift One Leg (Optional First Step): If you feel ready, you can lift one leg up slowly. See how it feels. Keep your base strong. Lower the leg. Try the other leg. This helps you feel the weight shift.
- Try a Small Hop (Carefully): If you feel strong and balanced on your base, you can try a small hop. Bend one knee. Push off the floor gently with that foot. See if your hips can stack more over your shoulders. Do not kick hard. This is not a jump. It is a small lift. The wall is behind you to catch you if you go too far.
- Lift Both Legs (or Knees to Chest): From the walked-in position, you can try to lift both feet off the floor. Some people bend their knees and bring them towards their chest first (like a little ball shape). This is called tucking. Once tucked, slowly lift your bent knees up. Then try to straighten your legs towards the ceiling.
- Use the Wall: If you lift your legs and start to tip, let your feet rest on the wall behind you. Use the wall for support. Do not lean all your weight into the wall. Use it for balance only. Keep your core strong. Keep pressing into your forearms.
- Find Your Balance (Headstand Alignment): Once up (with or without the wall), try to find balance. Stack your body. Your hips should be over your shoulders. Your feet should be over your hips. Imagine a straight line from your head to your feet. Squeeze your legs together. Point your toes or flex your feet. Keep your belly pulled in tight. Keep pressing forearms down. Keep your neck long; do not push into your head.
- Hold the Pose: Hold for a short time at first. Maybe 5-10 seconds. Work up to longer times. Only hold as long as you feel strong and safe. If your neck hurts, come down.
- Coming Down Safely: Bend your knees (tuck) or keep legs straight. Slowly lower your feet back to the floor. Do not drop down fast. If using the wall, slide your feet down the wall slowly.
- Rest: After coming down, rest in Child’s Pose for a few breaths. This helps your body reset.
Table: Supported Headstand Checklist
| Step | Action | Key Point |
|---|---|---|
| Set Up Base | Kneel, elbows under shoulders, measure with hands. | Elbows shoulder-width apart. |
| Clasp Hands | Hands forward, fingers clasped tightly, make cup shape. | Forearms & hands make triangle base. |
| Place Head | Top of head on floor, back of head against hands. | Find the crown of your head. |
| Lift Hips | Tuck toes, straighten legs, lift hips up. | Body like Dolphin Pose with head down. |
| Walk Feet In | Walk feet towards face, keeping legs straight if possible. | Hips move over shoulders. |
| Prepare to Lift | Press forearms down strong, pull belly in. | Shoulders work, not neck. |
| Lift (using wall) | Small hop, lift one/both legs, find wall support. | Do not kick hard, use wall for balance. |
| Align Body | Stack hips over shoulders, feet over hips. Straight line. | Press forearms, long neck, core strong. (Headstand alignment) |
| Hold | Stay for short time, increase slowly. | Only hold if strong and safe. |
| Come Down | Slowly lower feet, slide down wall if needed. | Do not drop fast. |
| Rest | Child’s Pose. | Let body rest. |
How to Do Tripod Headstand (Sirsasana II)
Tripod Headstand uses your hands on the floor. Your head and hands make a three-point base, like a tripod stand for a camera. This needs good wrist strength and balance. Using a wall is also very helpful here.
Using the Wall (Wall Headstand)
Again, start your practice facing a wall. Your mat should be against the wall.
Tripod Headstand Steps (with Wall)
Follow these steps with care.
- Set Up Your Base: Kneel on the floor. Place your hands on the floor in front of you. Your hands should be shoulder-width apart. Spread your fingers wide. Press down firmly through your palms and fingertips.
- Place Your Head: Lower the top of your head to the floor in front of your hands. Your head should be about one hand-length away from your fingertips. When your head is down and your hands are down, they should form a triangle shape. Your head is one point, your two hands are the other two points. This is your tripod base. Make sure you place the crown (top) of your head on the floor, not your forehead.
- Lift Your Hips: Tuck your toes under. Straighten your legs. Lift your hips up towards the ceiling, like in Downward Dog.
- Walk Your Feet In: Walk your feet towards your face. Keep pressing down into your hands. Walk in until your hips are stacked mostly over your shoulders. Your back might be rounded here, that’s okay for now.
- Knees to Elbows: This is a common way to enter Tripod Headstand. Bend your knees. Rest the tops of your knees on your upper arms, near your armpits or elbows. Keep pressing into your hands. Keep your core strong. This is a balance pose itself (sometimes called Baby Crow). Hold here for a moment.
- Prepare to Lift: Feel your weight shifting from your feet to your hands and head. Keep your core pulled in.
- Lift One Leg: From knees-to-elbows, you might try lifting one foot off your arm. Slowly lift it towards the ceiling. Keep the other knee resting on your arm. Lower it. Try the other leg.
- Straighten Legs (or Use Wall): From knees-to-elbows, you can try to straighten both legs up towards the ceiling. Or, if you lifted one leg, try lifting the other to join it. You will likely touch the wall behind you. Let the wall support you gently. Do not push hard into the wall.
- Find Your Balance (Headstand Alignment): Once up (with or without the wall), aim for a straight line. Hips over shoulders. Feet over hips. Legs strong and together. Point your toes or flex your feet. Keep pressing down into your hands. Keep your neck long. Do not dump weight into your head. Your core is key for stability.
- Hold the Pose: Hold for a short time at first. Build up slowly. Only hold if you feel strong and stable. If your neck or wrists hurt, come down.
- Coming Down Safely: Bend your knees (tuck) or keep legs straight. Slowly lower your feet back towards the floor. If using the wall, slide your feet down the wall. Lower your knees gently to the floor.
- Rest: After coming down, rest in Child’s Pose for several breaths.
Table: Tripod Headstand Checklist
| Step | Action | Key Point |
|---|---|---|
| Set Up Base | Kneel, hands shoulder-width, fingers spread. | Hands press down firmly. |
| Place Head | Top of head down, about hand-length from fingers. | Head and hands form a triangle base. |
| Lift Hips | Tuck toes, straighten legs, lift hips up. | Body like Downward Dog with head down. |
| Walk Feet In | Walk feet towards face, hips over shoulders. | Walk in until hips are high. |
| Knees to Elbows | Bend knees, rest them on upper arms/elbows. | Press hands down, core strong. |
| Lift (using wall) | Lift feet off arms, straighten legs, find wall support. | Do not kick hard, use wall for balance. |
| Align Body | Stack hips over shoulders, feet over hips. Straight line. | Press hands, long neck, core strong. (Headstand alignment) |
| Hold | Stay for short time, increase slowly. | Only hold if strong and safe. |
| Come Down | Slowly lower feet, slide down wall if needed, knees to floor. | Do not drop fast. |
| Rest | Child’s Pose. | Let body rest. |
Getting Your Body Right (Headstand Alignment)
Good Headstand alignment is very important. It keeps you safe. It helps you balance. It makes the pose feel lighter. Bad alignment can hurt your neck or wrists.
Key Points for Alignment
- Your Base: Whether Supported (forearms and hands) or Tripod (hands and head), your base must be strong. Press down firmly into the floor through your forearms and hands. This takes weight off your head and neck.
- Head Placement: Put the crown (the very top) of your head on the floor. Not the forehead, not the back. Find the spot where if you were standing straight, that part of your head would point to the sky.
- Neck is Long: Do not push or crunch into your neck. Imagine you are trying to lift your shoulders away from your ears. This keeps your neck long and safe. The main weight should be on your forearms/hands, with the head just there for balance.
- Body is Stacked: Think of stacking blocks. Your shoulders should be over your elbows/wrists. Your hips should be over your shoulders. Your feet should be over your hips. Aim for a straight line from the crown of your head to your heels.
- Core is Strong: Squeeze your belly muscles. Pull your belly button towards your spine. A strong core keeps your body straight. It stops you from arching your back. It helps you balance.
- Legs Engaged: Keep your legs active. Squeeze your thighs. Point your toes or flex your feet. Engaged legs help keep the straight line and help with balance.
Practice feeling this alignment even when using the wall. The wall helps you find the straight line. Over time, you will feel how to hold this shape without the wall.
Being Safe with Headstand
Safety is the most important thing when learning headstand. This pose is powerful, but you must treat it with respect.
Listen to Your Body
- No Neck Pain: If your neck hurts at all, come down right away. You might be putting too much weight on your head. Check your base. Check your head placement. Your forearms/hands should take most of the weight.
- No Sharp Pain: If you feel any sharp pain anywhere, gently come out of the pose.
- Feeling Dizzy: If you feel very dizzy or lightheaded, come down slowly. Rest.
When NOT to Do Headstand
Some people should not do headstand. Or they should ask a doctor first.
* If you have high blood pressure.
* If you have heart problems.
* If you have a neck injury or neck pain.
* If you have an eye problem (like glaucoma).
* If you are on your period.
* If you are pregnant.
* If you have a headache.
If you are unsure, ask a doctor or a qualified yoga teacher.
Practice Falling Safely
You will likely wobble or fall when learning. It is part of the process.
* Use the Wall: This is the best safety net. Practice with the wall behind you. If you start to tip backward, your feet hit the wall.
* Tuck and Roll: If you start to tip away from the wall (forward), bend your knees. Tuck your chin to your chest. Try to roll onto your back and shoulders, like a little ball. Do not try to stop yourself with outstretched arms; this can hurt your wrists.
Stuff That Can Go Wrong (Common Mistakes) & Fixes
Learning headstand has challenges. Here are some common problems beginners face and how to fix them.
Table: Common Headstand Mistakes and Fixes
| Problem | Why it Happens | How to Fix It |
|---|---|---|
| Neck Pain | Too much weight on head, neck not long. | Press down harder into forearms/hands. Think “shoulders away from ears”. Check head spot (crown). |
| Wobbling / Falling | Weak core, base not strong, body not aligned. | Work on core strength (Plank, Forearm Plank). Build arm/shoulder strength (Dolphin Pose). Practice finding alignment at the wall. Squeeze legs/belly. |
| Can’t Lift Up | Not walking feet in enough, hips not over shoulders. | Walk feet closer to your head. Get your hips stacked high over your shoulders before trying to lift. Build more strength in prep poses. |
| Fear | Being upside down feels scary, fear of falling. | Practice at the wall every time. It’s your safety net. Start with prep poses and feeling your weight shift. Go slow. |
| Arching Back | Core is not engaged. | Squeeze your belly button towards your spine. Imagine a string pulling your belly in. This helps keep your back straight. |
| Wrists Hurt (Tripod) | Dumping weight into hands, not using whole hand. | Press down through base of palm AND fingertips. Do not let wrists collapse. Distribute weight evenly. Build wrist strength with plank variations. |
Coming Down From Headstand
How you come down is as important as how you go up. Do it slowly and with control.
- Do not just drop your legs.
- Bend your knees and tuck them towards your chest slowly. Then lower your feet to the floor gently.
- Or, keep your legs straight and lower them slowly towards the floor behind you. If using the wall, slide your feet down the wall.
- Land lightly on your feet or knees.
What to Do After Headstand (Counter Poses)
After being upside down, it is good to do a pose that helps your body come back to normal. This is called a counter pose. The best one is Child’s Pose.
Child’s Pose
- Kneel on the floor.
- Touch your big toes together behind you.
- Spread your knees wide apart (or keep them together).
- Sit back on your heels.
- Lower your upper body down between your thighs.
- Rest your forehead on the floor.
- Stretch your arms forward or bring them back along your sides.
- Breathe deeply and relax completely.
Stay in Child’s Pose for at least as long as you were in headstand. Or longer. It calms your body and mind. It gently reverses the blood flow change.
Tips for Learning Headstand
- Be Patient: Headstand takes time. It can take weeks, months, or even longer. Do not get upset if you cannot do it right away.
- Practice Regularly: Short, regular practice is better than long practice once in a while. Try practicing prep poses and wall headstand a few times a week.
- Warm Up: Always warm up your body before trying headstand. Do some Sun Salutations. Do poses that open your shoulders and strengthen your core.
- Listen to Your Body: We said it before, but it is worth saying again. If something hurts, stop. Your body knows best.
- Practice Near a Wall: Even when you feel stronger, the wall is a good friend. It helps you check your alignment. It’s there if you lose balance.
- Get Help: If you can, learn from a qualified yoga teacher. They can see your body. They can give you tips that fit just you. They can help you with your alignment.
- Have Fun: Learning headstand is a journey. Enjoy the process. Feel the strength you are building. Celebrate small steps, like holding Dolphin longer or getting your hips higher on the wall.
Getting Better at Headstand (Progression)
Once you feel comfortable with wall headstand, you can start to practice moving away from the wall.
- Start by using the wall, but try to take your feet away for just a second or two. See if you can find your balance in the middle of the room.
- Slowly increase the time you hold the pose away from the wall.
- Keep practicing finding your alignment. Imagine the wall is still there, helping you stay straight.
- Remember that Supported Headstand and Tripod Headstand are different skills. You might master one before the other.
- As you get stronger and more stable, you can explore holding the pose for longer times. Some people hold it for several minutes. But only do this if it feels good and safe for your body.
Questions People Ask (FAQ)
h4 What part of the head touches the floor in headstand?
The very top of your head, called the crown, touches the floor. It is the spot where you would measure your height. It is not your forehead or the back of your head.
h4 Is headstand good for beginners?
Yes, beginners can learn headstand. But it needs careful preparation. It needs building strength first. It is not a pose to try without practice and maybe guidance. Using a wall is important for beginners.
h4 How long does it take to learn headstand?
It is different for everyone. For some, it might take a few weeks. For others, it could take months or even a year. Be patient. Focus on the steps and prep poses. Progress is not always fast, but it happens with practice.
h4 Should I feel weight on my head?
Some weight on your head is normal for balance. But the main weight should be pressing down through your forearms (Supported Headstand) or hands (Tripod Headstand). Your neck should feel long, not compressed or painful. If you feel a lot of pressure on your head or pain in your neck, adjust your base. Press down more into your arms.
h4 What if I am scared to go upside down?
It is normal to feel scared! Start small. Practice prep poses like Dolphin Pose. Practice getting your hips high over your shoulders at the wall. Slowly get used to having your head lower than your heart. Use the wall every time until your fear goes away. Take breaks. Breathe. It is okay to feel scared, just move slowly and safely.
h4 Can I do headstand if I have tight shoulders?
Tight shoulders can make headstand harder, especially Supported Headstand where you need to press down through your forearms. Work on poses that open your shoulders first. Dolphin Pose helps with this. Puppy Pose or threading the needle can also help. Get more flexibility and strength in your shoulders before putting weight on them in headstand.
Wrapping Up
Learning Sirsasana, the yoga headstand, is a rewarding journey. It builds strength, balance, and confidence. Remember to start with Headstand preparation. Build your strength with poses like Dolphin pose and Forearm Plank (Forearm stand prep). Use the Wall headstand technique every time you practice the Supported Headstand or Tripod Headstand steps. Pay close attention to Headstand alignment to stay safe and make the pose work for you. Be patient with yourself. Practice often. And always, always listen to your body. Enjoy your journey upside down!