
Image Source: jivayogalive.com
Beginner’s Guide: How To Start Yoga At Home For Beginners
So, you want to start yoga? Great choice! Yoga is an ancient practice that brings together your mind, body, and spirit. It involves movement, breathing, and quiet thinking. Can you start yoga at home as a complete beginner? Absolutely, yes! It’s a fantastic way to begin. Home yoga gives you comfort, privacy, and flexibility to fit it into your busy life. Anyone can do yoga, no matter their age, shape, or fitness level. This guide will show you how to take your first steps into the wonderful world of home yoga.
Why Begin Your Yoga Path at Home?
Choosing to start yoga in your own space has many good points. It’s more than just being easy. Benefits of home yoga are many for new learners.
Ease and Comfort
Doing yoga at home means you don’t need to travel. You save time and gas. You can wear what you want and practice in your own familiar space. This comfort helps you relax and focus on your practice without feeling judged or shy.
Flexibility in Your Schedule
Life is busy. Finding time for a class can be hard. With home yoga, you set your own hours. You can do a short practice in the morning, a longer one in the evening, or even split it up. Your yoga fits around your life.
A Private Place to Learn
When you are new, you might feel a bit clumsy. Practicing at home gives you privacy. You can try new yoga poses for beginners without worry. It helps you build confidence before possibly joining a class later.
Saves Money
Yoga classes can cost a lot. Starting at home is much cheaper. Once you have a few basic things, like a mat, you can practice for free using many online helps.
Getting Healthier
Regular yoga at home helps you get stronger and more flexible. It also helps calm your mind and lower stress. These are big benefits of home yoga that make you feel better overall.
Getting Ready: The Basics
To start your home yoga journey, you need a few simple things. You don’t need fancy stuff to begin.
Finding Your Special Spot
Pick a place in your home where you have some room to move. It should be quiet and calm. It could be a corner of your living room, bedroom, or even outdoors if the weather is nice. Make sure the floor is flat and not too hard or too soft. Having a wall nearby can be helpful for some poses later on.
Gathering Your Gear: Yoga Equipment for Home
You don’t need much, but a few items can make your practice better and safer.
Your First Mat: Yoga Mat for Beginners****
This is the most important piece of yoga equipment for home. A good mat helps you not slip and gives padding for your joints. For beginners, look for a mat that:
- Is not too thin: Around 4-6 mm is good for padding.
- Has good grip: This stops your hands and feet from sliding. Rubber or PVC are common materials.
- Feels comfortable: You will spend time on it!
You can find a yoga mat for beginners at many stores or online. Pick a color or design you like!
Other Helpful Items (Optional at First)
- Yoga Blocks: These are firm blocks, often made of foam. They help bring the floor closer to you in poses. This is great if you have tight muscles or short arms.
- Yoga Strap: A long belt or strap. It helps you reach parts of your body or go deeper into stretches if your muscles are tight.
- Bolster or Firm Pillow: A firm cushion or pillow can make seated poses or resting poses more comfortable.
- Blanket: A folded blanket can pad your knees or make sitting easier.
Don’t feel you need all of these right away. A good yoga mat for beginners is enough to start. You can always get more yoga equipment for home as you go.
Making Time: Your Yoga at Home Schedule
One great thing about home yoga is making it fit your life. But having a plan helps you stick with it.
How Often Should You Practice?
Aim for consistency, not perfection. Even short practices a few times a week are better than long ones rarely.
* Start small: Try for 10-15 minutes, 2-3 times a week.
* Build up: As you feel more comfortable, you can practice longer or more often. Maybe 20-30 minutes, 3-4 times a week.
* Listen to your body: Some days you might feel like doing more, other days less. That’s fine.
How Long Should Sessions Be?
For a beginner, 15-30 minutes is a great start. This gives you enough time to warm up, do some poses, and finish with a little rest. As you get stronger, you can increase the time.
Finding Your Best Time
When do you feel most able to practice without being rushed?
* Morning: Can wake you up and set a calm tone for the day.
* Lunchtime: A short break to refresh your mind and body.
* Evening: Helps you relax and wind down before bed.
Experiment to find what works best for you. The key is to make it a regular habit. Set a reminder on your phone if that helps! Creating a yoga at home schedule you can stick to is important.
Connecting Inward: Yoga Breathing Exercises
Breath is a huge part of yoga. It’s not just about the poses. How you breathe helps calm your mind, gives energy, and helps you move deeper and safer in poses. These are called Pranayama in yoga.
Why Focus on Breath?
- Calms the Mind: Slow, deep breaths tell your body to relax.
- Increases Energy: Better breathing helps your body use oxygen well.
- Helps Movement: Breathing with your movements makes poses feel smoother.
- Focus: Paying attention to breath keeps your mind from wandering.
Simple Yoga Breathing Exercises for Beginners
You don’t need to learn many techniques at first. Start with simple ones.
Three-Part Breath (Dirga Pranayama)
This breath fills your lungs completely.
1. Sit or lie down in a comfy spot. Place one hand on your belly, the other on your chest.
2. Breathe in slowly through your nose. Feel your belly fill with air like a balloon. (Part 1)
3. Keep breathing in, letting the air fill your rib cage, making your ribs expand. (Part 2)
4. Keep breathing in, letting the air fill the top of your chest, near your collarbones. (Part 3)
5. Breathe out slowly through your nose. Let the air leave your chest, then your ribs, then your belly. Feel your belly softly fall.
6. Repeat for 5-10 breaths. Notice how your body feels filling and emptying with air.
Simple Calm Breath (Ujjayi – Modified)
This breath makes a soft sound in your throat like ocean waves. It’s often used during poses.
1. Sit tall. Close your mouth gently.
2. Breathe in through your nose, lightly tightening the back of your throat. It will make a soft, gentle sound like a whisper or light snore.
3. Breathe out through your nose, keeping that gentle throat tightness. Again, hear the soft sound.
4. Keep your breath smooth and even.
Don’t worry about making the perfect sound. Just focus on breathing slowly and steadily through your nose with a slight feel in your throat. Practice these yoga breathing exercises for a few minutes before you start your poses.
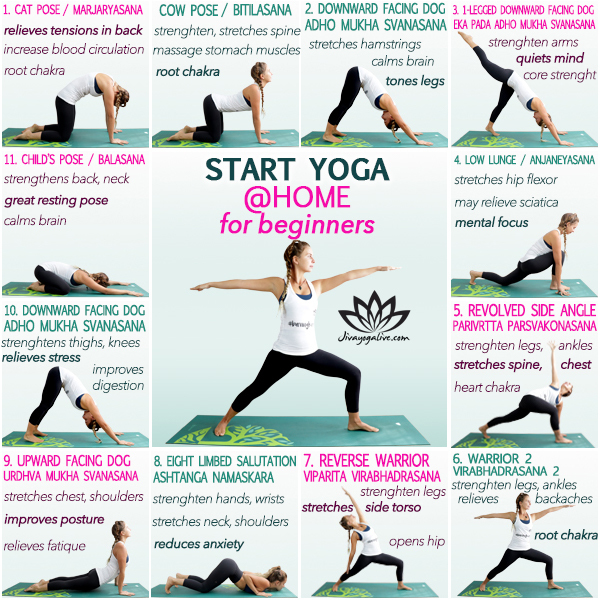
Beginning to Move: Easy Yoga Poses
Now for the fun part – the poses! Don’t feel you need to be flexible or strong to do them. Yoga is for everyone. These are some easy yoga poses that are great for beginners. Focus on moving slowly and listening to your body.
Foundational Standing Poses
Mountain Pose (Tadasana)
This pose is simple but important. It teaches you how to stand with good posture.
1. Stand with your feet hip-width apart or together.
2. Stand tall. Feel your feet grounded on the mat.
3. Straighten your legs but don’t lock your knees.
4. Lift your chest. Roll your shoulders back and down.
5. Let your arms hang by your sides, palms facing forward.
6. Look straight ahead. Breathe evenly. Feel strong like a mountain.
Standing Forward Fold (Uttanasana – Modified)
This helps stretch your back and the backs of your legs.
1. Start in Mountain Pose.
2. As you breathe out, bend forward from your hips.
3. Let your head hang down. Keep your knees soft or slightly bent. This helps your back.
4. Let your hands hang or rest them on your shins or thighs (not knees).
5. Breathe here for a few breaths. To come up, bend your knees more and roll up slowly, or keep your back straight and lift with your legs.
Downward-Facing Dog (Adho Mukha Svanasana – Modified)
This pose stretches your whole body and builds strength.
1. Start on your hands and knees, hands under shoulders, knees under hips.
2. Spread your fingers wide.
3. Breathe out and lift your hips up and back.
4. Make an upside-down V shape with your body.
5. Keep your knees bent a lot! This is important for beginners to help lengthen the back.
6. Push into your hands. Let your head hang.
7. Hold for a few breaths. Over time, you can slowly try to straighten your legs, but keep a bend if your back rounds.
Helpful All-Fours Poses
Cat-Cow Pose (Marjaryasana-Bitilasana)
This gentle movement warms up your spine.
1. Start on your hands and knees. Hands under shoulders, knees under hips.
2. As you breathe in (Cow), drop your belly towards the floor, lift your chest and tailbone. Look slightly up.
3. As you breathe out (Cat), round your spine towards the ceiling, tuck your chin to your chest, and pull your belly button in.
4. Move slowly between Cat and Cow with your breath for 5-10 rounds.
Simple Seated Poses
Easy Pose (Sukhasana)
This is a simple cross-legged seat, often used for breathing or quiet time.
1. Sit on the floor with your legs crossed. You can sit on a folded blanket or cushion to lift your hips. This makes sitting taller easier.
2. Rest your hands on your knees.
3. Sit up tall, lengthening your spine. Relax your shoulders.
4. Breathe here.
Calming Reclining Poses
Bridge Pose (Setu Bandhasana)
This pose helps open the chest and strengthen the back of the body.
1. Lie on your back with your knees bent and feet flat on the floor, hip-width apart. Your heels should be close to your hips.
2. Keep your arms by your sides, palms down.
3. As you breathe in, press into your feet and lift your hips off the floor towards the ceiling.
4. Keep your knees from spreading wide.
5. Hold for a few breaths, then lower slowly as you breathe out. Repeat 2-3 times.
Supine Spinal Twist (Supta Matsyendrasana)
A gentle twist to release tension in the back.
1. Lie on your back. Bring both knees towards your chest.
2. Let both knees fall gently to one side (e.g., the right).
3. Keep your shoulders as flat on the floor as you can. You can look up or turn your head away from your knees (to the left).
4. Hold for several breaths.
5. Bring knees back to center and repeat on the other side.
Corpse Pose (Savasana)
This is a resting pose at the end of your practice. It is very important!
1. Lie flat on your back. Let your legs extend long, letting your feet fall open.
2. Let your arms rest by your sides, palms facing up.
3. Close your eyes.
4. Let your whole body relax completely. Let go of any tension.
5. Just rest and breathe for 5-10 minutes.
These yoga poses for beginners are a great place to start. Don’t worry about doing them perfectly. Focus on how they feel in your body.
Putting it Together: A Beginner Yoga Sequence
Once you know a few basic poses, you can link them together. A simple beginner yoga sequence can look like this:
-
Start Quietly (5 minutes):
- Sit in Easy Pose on your mat. Do the Three-Part Breath for a few minutes.
- Lie down for a moment to connect with your breath.
-
Warm Up Gently (5-10 minutes):
- Start on hands and knees. Do Cat-Cow pose for 5-10 rounds with your breath.
- Move into a gentle Downward-Facing Dog (with very bent knees). Hold for 5 breaths.
- Walk your hands back to your feet for a Standing Forward Fold (knees bent). Hang for a few breaths.
- Slowly roll up to stand in Mountain Pose.
-
Flow Through Poses (10-15 minutes):
- From Mountain Pose, flow between Mountain Pose and Standing Forward Fold a few times with your breath.
- Go back to hands and knees.
- Try Bridge Pose (2-3 times).
- Do Supine Spinal Twist (both sides).
-
Rest and Finish (5-10 minutes):
- End your practice in Corpse Pose (Savasana). Allow yourself to rest completely.
This is just one example of a beginner yoga sequence. You can change it based on how you feel or which poses you like. The goal is to move your body gently and connect your breath to your movement.
Boosting Flexibility: Yoga for Flexibility
Many people start yoga wanting to touch their toes or become more bendy. Yoga is wonderful for this. Yoga for flexibility works by gently stretching your muscles and connective tissues.
How Yoga Helps You Stretch
- Holding Poses: Staying in a pose for a few breaths allows muscles to slowly lengthen.
- Connecting Breath: Breathing deeply helps your body relax into stretches.
- Gentle Movement: Moving slowly between poses warms up muscles safely.
Poses Great for Yoga for Flexibility
Many poses help, but some focus more on stretching:
- Standing Forward Fold: Stretches the backs of the legs and the back. Remember to keep knees soft.
- Cat-Cow: Great for spine flexibility.
- Downward-Facing Dog (Modified): Stretches hamstrings (back of thighs), calves, and shoulders. Keep knees bent to protect hamstrings.
- Supine Spinal Twist: Improves flexibility in the spine and torso.
- Easy Pose: Helps open the hips, especially if you sit cross-legged often.
Remember that becoming flexible takes time and practice. Don’t force stretches. Just move to a point where you feel a gentle pull, but no pain. Yoga for flexibility is a journey, not a race.
Finding Help: Online Yoga Classes for Beginners
While you can definitely start on your own with this guide, using online yoga classes for beginners can be very helpful. They guide you through practices and show you how to do poses correctly.
Why Use Online Classes?
- Guided Practice: A teacher tells you what to do and when to breathe.
- See the Poses: You can watch someone do the poses, which helps you learn.
- New Sequences: Online classes offer many different practices to keep things fresh.
- Convenience: You can access classes anytime, anywhere.
Where to Find Online Yoga Classes for Beginners
- YouTube: Lots of free classes for all levels. Search for “beginner yoga,” “gentle yoga,” or “easy yoga poses.”
- Yoga Apps: Many apps offer guided practices, often with video. Some are free, others need a paid plan.
- Online Platforms: Websites focused just on yoga often have high-quality classes for a monthly fee.
Tips for Choosing an Online Class
- Look for “Beginner” or “Gentle”: Make sure the class is designed for people just starting out.
- Check the Length: Pick classes that fit your yoga at home schedule (15-30 minutes is good).
- Listen to the Teacher: Find an instructor whose voice and style you like.
- Watch First: If you’re unsure, watch part of the video before trying it.
Using online yoga classes for beginners can give you a good structure and help you feel more confident as you learn.
Staying Safe and Happy on Your Yoga Journey
Starting anything new takes patience. Here are a few tips to help you enjoy your home yoga practice and stay safe.
Listen to Your Body
This is the most important rule. Yoga is not about pushing through pain. It’s about finding a comfortable challenge. If a pose hurts, ease out of it or skip it. There are always ways to change poses to make them easier or harder. Use your yoga equipment for home like blocks and straps to help your body feel supported.
Be Patient
You will not be able to do every pose perfectly on day one. That’s okay! Yoga for flexibility and strength takes time. Celebrate small steps, like holding a pose a little longer or feeling a bit more comfortable.
Don’t Compare Yourself
Your yoga journey is yours alone. Don’t compare your progress to others you see online or anywhere else. Focus on how you feel and what your body can do today.
Make it Enjoyable
Put on some calm music if you like. Light a candle. Practice outside if the weather is good. Make your space and time feel special so you look forward to it. Your yoga at home schedule should feel like a treat, not a chore.
Frequently Asked Questions (FAQ)
Here are some common questions beginners ask about starting yoga at home.
Q: I’m not flexible at all. Can I still do yoga?
A: Yes! Yoga is for everyone, especially if you are not flexible. The poses themselves are tools to help you gain flexibility over time. Start with easy yoga poses and don’t worry about how deep you go. Consistency is key for yoga for flexibility.
Q: How long until I see results?
A: You might feel calmer or notice small changes in how your body feels after just a few practices. Big changes in strength or yoga for flexibility might take several weeks or months of regular practice. Be patient and enjoy the process.
Q: What should I wear?
A: Wear comfy clothes that you can move freely in. Leggings, shorts, t-shirts, or tank tops are fine. You don’t need special yoga clothes to start.
Q: What if I have an old injury?
A: If you have an injury or health concerns, it’s always a good idea to talk to your doctor before starting any new exercise, including yoga. When you practice, be extra careful with the injured area. Look for gentle online yoga classes for beginners that offer ways to change poses.
Q: Can I eat before yoga?
A: It’s best not to eat a heavy meal right before yoga. A light snack an hour or two before is usually okay. A full stomach can make some poses uncomfortable.
Q: How is home yoga different from a studio class?
A: Home yoga offers privacy and flexibility. Studio classes offer face-to-face guidance from a teacher and the energy of practicing with others. Both are great! Starting at home is a fantastic first step.
In Closing
Starting yoga at home is a wonderful gift you can give yourself. It’s a path to feeling better in your body and calmer in your mind. Remember that you don’t need to be perfect or have lots of fancy yoga equipment for home. Just start with a yoga mat for beginners, find a little space, and begin with simple yoga breathing exercises and easy yoga poses. Use this guide to help you create a yoga at home schedule that works for you. Explore online yoga classes for beginners when you feel ready for more guidance. Your journey into yoga for flexibility and well-being starts one breath and one pose at a time. Enjoy the process!