
Are you wondering how to put strap on yoga mat easily and keep it safe? Yes, you can learn to tie a yoga mat strap quickly and keep your mat rolled up tight. This guide shows you a simple way to attach yoga mat strap to your mat so you can carry it with ease. We will walk through the steps for a basic yoga mat strap tie. This easy method helps you secure yoga mat strap every time. Get ready to make carrying your mat simple!
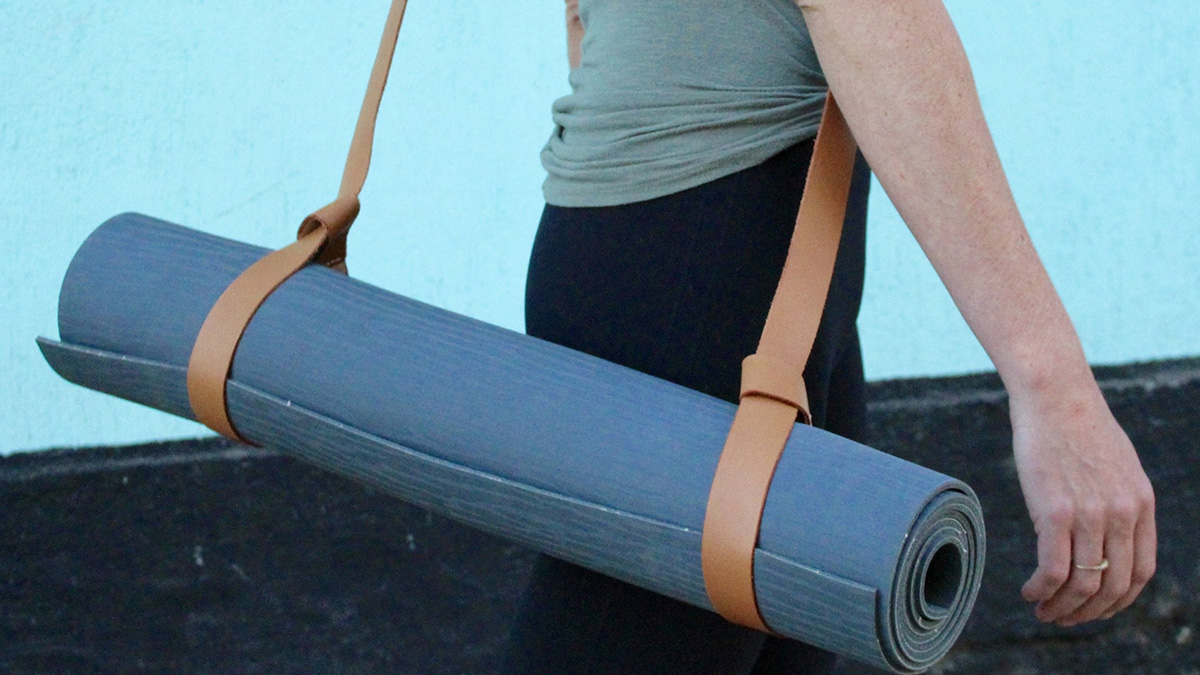
Image Source: www.yogafitness.group
The Simple Job of a Yoga Mat Strap
A yoga mat strap is a simple tool. It helps you carry your yoga mat. Think of it as a simple holder for your mat. When your mat is rolled up, the strap goes around it. It keeps the mat from unrolling. It also gives you something to put on your shoulder. This makes carrying yoga mat strap easy when you walk or ride to your yoga class.
Using a strap is part of basic yoga mat strap usage. It saves you from holding a bulky mat under your arm. It frees up your hands for other things, like your keys or phone. Learning how to tie a yoga mat strap helps you use this tool the right way.
Why Tie Your Strap Well?
Tying your strap well is important. A good tie keeps your mat rolled up tightly. If the strap is loose, your mat can unroll a little. This makes it harder to carry. A loose strap can also slip off. You don’t want your mat falling open on the street or on the bus.
A secure yoga mat strap tie means your mat stays neat. It is ready for your next class. It also makes carrying it comfortable. A well-tied strap sits better on your shoulder. It does not shift around. So, learning the right yoga mat strap tying instructions is worth a few minutes of your time.
Getting Ready: Your Mat and Strap
Before you tie your strap, make sure your mat is rolled up nicely. Roll it up tightly from one end to the other. A tight roll makes the mat small and easy to manage.
You also need your strap. Yoga mat straps are usually made of cotton or canvas. They have a loop or buckle at each end, or they are just a long piece of fabric. For this basic guide, we will focus on straps that are just a long piece of fabric or straps with simple loops. These are very common and easy to learn with.
Make sure your strap is not twisted. Lay it out flat. This makes the tying process easier. Now you have your rolled mat and your strap ready. You are set to learn how to put strap on yoga mat.
Tying the Basic Yoga Mat Sling Knot
This is a very common and easy way to tie many simple yoga mat straps. It makes a type of yoga mat sling knot. It works for straps that are just a long piece of fabric or those with basic loops.
Here are the steps for this simple yoga mat strap tutorial:
h4. Step 1: Lay the Mat Down
Put your rolled yoga mat on the floor. It should be in front of you.
h4. Step 2: Position the Strap
Take your strap. Find the middle of the strap. Put the middle of the strap under your rolled mat. It should be near one end of the mat.
Imagine the mat is a log. You are putting the strap under the log. The strap goes across the mat’s width.
h4. Step 3: Bring the Ends Up
Hold both ends of the strap. Bring them up over the top of the mat. The strap now goes under the mat and up over the top.
h4. Step 4: Cross the Ends
Take the two ends of the strap that are now on top of the mat. Cross them over each other. Like when you start to tie your shoes.
h4. Step 5: Make the First Loop
Now, take one of the ends. Tuck it under the strap loop that is already around the mat. Pull it through.
Think of it like this: The strap makes a circle around the mat. You are pushing one end under this circle and pulling it out the other side. This starts to create a knot.
h4. Step 6: Tighten This Side
Pull that end you just tucked under. Pull it snugly. This loop should tighten around the mat. It makes a secure hold on this side of the mat.
h4. Step 7: Repeat on the Other Side
Now do the same thing with the other end of the strap. Tuck it under the strap loop around the mat. Pull it through.
This second end also goes under the main strap circle. Pull this end snug as well.
h4. Step 8: Slide the Loops to the Ends
You now have two loops holding the mat. One loop is made by the strap crossing over itself and tightening. Slide these loops towards the ends of your yoga mat. One loop goes near one end of the mat. The other loop goes near the other end.
This creates two secure points holding the mat roll.
h4. Step 9: Check the Hold
Look at the loops. Are they tight around the mat? Can you slide the mat out easily? You should not be able to. The strap should hug the mat roll firmly.
This method is a very simple yoga mat carrier strap tie. It is one of the easiest ways to attach yoga mat strap. It uses the tension of the strap itself to hold the mat.
Securing the Mat with Loops
Some straps come with pre-made loops at each end. These are often called ‘sling’ straps. These are even easier to use. You don’t tie a knot in the usual sense. You use the loops to secure the mat.
Here is how to use a strap with loops:
h4. Step 1: Lay the Mat Down
Roll your mat tight. Lay it on the floor.
h4. Step 2: Put One Loop On
Take one end of the strap with a loop. Slip this loop over one end of your rolled mat. Pull it down the mat a little bit, maybe 3-4 inches from the end.
h4. Step 3: Put the Other Loop On
Go to the other end of the strap. It has the second loop. Slip this loop over the other end of your rolled mat. Pull it down a similar distance from that end.
h4. Step 4: Adjust and Tighten
Now the strap forms a long loop with your mat inside. The loops at the ends of the strap are holding the ends of the mat. Pull the main part of the strap (the long part between the loops) gently. This will make the end loops tighten around the mat roll.
Adjust the loops so they are snug. They should not be so tight that you damage the mat, but tight enough that the mat does not slip out.
This method is very fast. It is another form of yoga mat strap tying instructions, but without a complex knot. It relies on the loop design. It is a quick way to attach yoga mat strap.
More Ways to Tie (Advanced Simple)
What if your strap is just a long, long piece of fabric? The first method works, but there is another way that can feel more secure for some people. It uses a slightly different yoga mat sling knot idea. This can be part of a broader yoga mat strap guide.
h4. Method Two: Using Two Separate Ties
For a very long strap, you can treat it almost like two shorter straps.
h4. Step 1: Fold the Strap
Fold your long strap in half.
h4. Step 2: Place Under Mat
Put the middle point (where it is folded) under one end of your rolled mat.
h4. Step 3: Bring Ends Up and Over
Bring both ends up over the mat, just like in the first method.
h4. Step 4: Tie a Simple Knot
Now, take those two ends. Tie a simple knot right on top of the mat. A basic overhand knot is fine. Like the first step of tying a shoe. Pull it snug, but not too tight that you can’t untie it later. This holds this end of the mat.
h4. Step 5: Slide to the End
Slide this knot and loop you just made down to the very end of the mat.
h4. Step 6: Move to the Other End
Now, take the rest of the long strap. It goes along the length of your mat. Move down to the other end of your mat.
h4. Step 7: Repeat the Knot
At this other end, use the remaining strap length. Wrap it around the mat. Tie another simple knot here.
You are making a knot near one end, and then moving down the strap and mat to make another knot near the other end. This is another way to secure yoga mat strap using simple knots.
h4. Step 8: Adjust and Check
Check both knots. Are they holding the mat ends? Is the mat secure? The long part of the strap between the knots becomes your shoulder strap.
This method uses two tying points. It can feel very secure. It is a good yoga mat strap guide for longer, simpler straps.
Why So Many Ways? Grasping the Choices
You might wonder why there are different ways to tie or attach yoga mat strap. It is mainly because straps are made in different ways.
- Simple Fabric Straps: These are just long strips. They need a knot or a series of wraps to hold the mat. The first two tying methods work well for these.
- Straps with Loops: These are designed for speed. The loops are pre-made. You just slip them on the mat ends. The second method shows how to use these.
- Straps with Buckles or Rings: Some straps have hardware. They might have plastic buckles, metal rings, or adjustable sliders. These do not need tying. You thread the strap through the hardware to make a loop that tightens around the mat.
This yoga mat strap guide focuses on the tying methods for simple straps. These are often the most common types you might find.
Checking Your Secure Yoga Mat Strap
Once you have tied your strap, always check it. A few quick checks can save you trouble later.
- Is the Mat Tight? Try to wiggle the mat out of the strap loops. It should feel snug. It should not slip out easily.
- Are the Knots Tight? If you used knots, are they pulled reasonably tight? Not so tight you can’t untie them, but firm.
- Is it Balanced? When you pick up the mat by the strap, does it hang straight? Or does one end drop lower? If it drops, the loops might not be spaced evenly, or one loop might be looser than the other. Adjust the loops or knots along the mat to make it hang evenly.
- Is it Comfortable? Put the strap on your shoulder. Does it feel okay? Is the mat bumping your legs in a strange way? Adjust where the strap sits on the mat or how you hold it.
These simple checks ensure your yoga mat carrier strap tie is doing its job well.
Using Your Carrying Yoga Mat Strap
Once your mat is tied and secure, it is ready to go. Most people carry the mat with the strap over one shoulder. The mat hangs down your back or side.
- Over One Shoulder: This is the most common way. The strap goes over your head and rests on one shoulder. The mat hangs vertically down your back.
- Across the Body: For more stability, you can wear the strap across your chest, like a messenger bag. The mat sits against your back or side. This is good if you are walking or biking further.
The length of your strap will affect how comfortable this is. Many straps are adjustable. If yours is adjustable, make it a length that feels good for you. Not so long that the mat hits the ground, and not so short that it is up in your armpit. This is part of knowing proper yoga mat strap usage.
Fathoming Common Issues and Fixes
Sometimes, things don’t go perfectly the first time you tie your strap. Here are some common problems and how to fix them.
h4. Problem: The mat keeps unrolling a little bit.
- Possible Reason: The strap loops are not tight enough.
- Fix: If you used the first tying method (single strap, two loops), pull the ends you threaded under the main strap again, making them snugger. If you used loops, pull the main part of the strap tighter to cinch the loops. If you used two knots, pull the knots tighter. Also, make sure your mat was rolled very tightly to begin with.
h4. Problem: The mat slips out of the strap.
- Possible Reason: The loops are too loose, or they slipped towards the middle of the mat instead of staying near the ends.
- Fix: Re-tie or re-loop the strap. Make sure the loops are right at the ends of the rolled mat. The ends of the mat should feel ‘captured’ by the strap loops.
h4. Problem: The strap feels twisted when I carry it.
- Possible Reason: The strap was twisted when you tied it, or the way you are wearing it twists it.
- Fix: Untie the strap. Lay it flat. Make sure there are no twists in the strap itself before you tie it around the mat. When you put it on your shoulder, make sure the strap is flat against your body, not folded or twisted.
h4. Problem: The knot is too hard to untie.
- Possible Reason: You pulled the knot too tight.
- Fix: Try to loosen the knot gently. Wiggle it back and forth. If it’s very tight, you might need help, or in rare cases, carefully cut the strap (but try loosening first!). Next time, pull snug, but know you need to untie it later. Simple knots like an overhand knot are usually easy to untie if not pulled with extreme force. This is why learning a basic yoga mat strap tying instructions is key – it should be easy to undo!
h4. Problem: The mat hangs unevenly.
- Possible Reason: The strap loops are not the same distance from the ends, or one loop is tighter than the other, causing one end of the mat to hold higher.
- Fix: Adjust the position of the loops or knots on the mat. Try to get them roughly the same distance from each end. For the loop method, make sure both loops are pulled equally snug.
These fixes cover most common issues when using a basic yoga mat carrier strap tie.
Diving Deeper into Yoga Mat Strap Types
As part of a complete yoga mat strap guide, let’s look at different types of straps and how they work, even if they don’t need tying.
h4. Fabric Sling Straps (Tying or Loops)
- Description: Long piece of cotton or canvas fabric. Some are just a strip, others have sewn loops at the ends.
- How they work: You either tie them with knots (Method 1 or 2) or slip the pre-made loops over the mat ends (Loop Method).
- Pros: Simple, lightweight, affordable, easy to wash. Often comfortable for carrying.
- Cons: Tying can take a moment. Loops might be too big or small for some mats.
h4. Buckle/Clip Straps
- Description: Fabric strap with plastic or metal buckles, clips, or sliders.
- How they work: You wrap the strap around the mat and thread it through the hardware. The buckle/clip holds the strap taut and forms loops that tighten around the mat. No tying needed.
- Pros: Very fast to attach and remove. Adjustable tightness.
- Cons: Hardware can be noisy or bulky. Buckles can sometimes break.
h4. Velcro Straps
- Description: Shorter straps with velcro on the ends. Usually come in pairs.
- How they work: You wrap one strap around each end of the rolled mat and press the velcro together to secure.
- Pros: Super fast. Very simple concept.
- Cons: Only secure at the two points where the straps are. Can be less secure than a full sling strap. Velcro can wear out.
h4. Bag-Style Carriers
- Description: These are not straps, but full bags that the mat slides into. Some have a shoulder strap attached.
- How they work: The mat goes inside the bag. A drawstring or zipper closes it.
- Pros: Protects the mat, often has pockets for keys/phone. Easy to carry with a strap.
- Cons: Can be bulky, cost more than a simple strap. Mat needs to be fully rolled to fit.
This guide focuses on how to tie the fabric strap types, as that’s where the “tying” skill comes in. But it’s good to know other options exist when thinking about yoga mat carrier strap options.
Getting the Right Strap for Your Mat
Choosing the right strap can make learning how to tie a yoga mat strap or using any strap much easier.
- Mat Thickness: Very thick mats might need a longer strap or larger loops than thin mats. Check the strap description or try it with your mat if possible.
- Strap Length: A longer strap gives you more room to tie knots or adjust how you carry it. If you are tall or like to wear the strap across your body, a longer strap is better.
- Material: Cotton is soft and breathes well. Canvas is more durable. Consider what feels comfortable on your shoulder.
- Strap Width: Wider straps can feel more comfortable on your shoulder because they spread the weight. Thin straps might dig in.
If you are getting a simple fabric strap to learn how to tie, a medium length (say, 6-7 feet) and medium width (about 1-1.5 inches) is a good starting point. This makes learning the yoga mat strap tying instructions easy.
Making Your Tying Even Easier
Practice makes perfect, even with simple tasks like tying a strap. Here are tips to make it even easier over time:
- Roll Tight: Always start with a very tightly rolled mat. This makes it smaller and easier to wrap the strap around.
- Keep Strap Flat: As you tie, keep the strap flat. Avoid twists. This makes the knot or loop lay correctly and hold better.
- Don’t Rush: The first few times, take your time. Follow the yoga mat strap tutorial step-by-step. Soon, you will be able to do it without thinking.
- Use the Floor: Tying on the floor helps. You can see what you are doing and use gravity to help position the mat and strap.
- Find Your Method: Try the different simple methods shown. See which one feels best and most secure for your strap and your mat. Stick with that method.
These tips help you master how to put strap on yoga mat and ensure it is a secure yoga mat strap tie every time.
The Joys of a Well-Secured Mat
Using a yoga mat strap correctly brings simple joys:
- Easy Transport: Your hands are free. You can bike, walk, or use public transport with ease.
- Neatness: Your mat stays rolled up and tidy at home or in your car.
- Ready to Go: No fumbling with an unrolling mat. When you arrive, just untie or unloop and unroll.
- Simple Tool: It’s a low-tech, reliable way to manage your mat.
Mastering the basic yoga mat strap tying instructions unlocks these simple benefits.
Comparing Tying Methods (Simple Straps)
Let’s look at the simple tying methods side-by-side. This table helps clarify the yoga mat strap guide for different strap types.
| Method | Strap Type | What You Do | Security Level (Simple Straps) | Speed | Notes |
|---|---|---|---|---|---|
| Basic Sling Knot (Method 1) | Simple Fabric Strip | Place middle under mat, cross ends, tuck & tighten | Good | Moderate | Creates two tightening loops at ends. |
| Loop Method | Fabric Strap w/ Loops | Slip loops over each end of mat, adjust tension | Good | Fast | Relies on pre-made loops. |
| Two Separate Ties (Method 2) | Long Fabric Strip | Fold strap, tie knot at one end, tie knot at other | Very Good | Moderate | Uses two specific knot points. |
This table helps when you want to decide which method to use based on your strap. It’s a quick reference for your yoga mat strap tutorial journey.
Knowing When to Untie Your Strap
You don’t need the strap on all the time. Untie your strap when:
- You arrive at your yoga class or practice space.
- You are storing your mat at home for a long time (letting it breathe is good).
- You need to clean your mat (straps can sometimes get dirty too).
- You are cleaning the strap itself.
Knowing how to untie is just as important as knowing how to tie! If you used simple knots, they should loosen with a bit of wiggling. The loop method is very fast to undo – just slip the loops off.
Caring for Your Strap
Your yoga mat strap works hard. Keep it clean. Most fabric straps can be washed.
- Check the tag for washing instructions.
- Most cotton or canvas straps can be hand washed in cool water with mild soap.
- You can also put some in a washing machine on a gentle cycle (maybe in a mesh bag).
- Hang it to air dry.
- Do not machine dry as it might shrink or damage the fabric, especially if there are any plastic parts.
A clean strap is nice to use. It stays soft and lasts longer. Taking care of your strap is part of good yoga mat strap usage.
Interpreting Different Yoga Mat Straps
Sometimes, a strap might look different. It might have rings. Or a special buckle.
h4. Straps with Rings
Some straps have two metal rings on one end.
- How to use: You thread the other end of the strap through both rings. Then, you thread it back through only the first ring. This creates a loop that you can put around the mat. Pulling the loose end tightens the loop around the mat. You make one loop near each end of the mat this way. It acts like a buckle.
This method uses friction from the rings to hold the strap tight. It’s another way to attach yoga mat strap without tying a traditional knot. It’s often covered in a detailed yoga mat strap guide.
No matter the type, the goal is always the same: securely wrap the strap around the rolled mat so you can carry it easily. The easy way to learn is to start with a simple fabric strap and one of the basic tying methods we covered.
Expanding Your Yoga Mat Skills
Learning how to tie your mat strap is a small but useful yoga skill. It makes your yoga practice journey smoother. No more struggling with a mat that keeps unrolling!
This guide has given you yoga mat strap tying instructions for common strap types. You learned how to attach yoga mat strap using simple knots or loops. You saw a yoga mat strap tutorial broken down into easy steps. You now know how to make a secure yoga mat strap using a basic yoga mat sling knot or the loop method. You have a basic yoga mat strap guide to help you choose and use straps. You understand carrying yoga mat strap options and general yoga mat strap usage, including how to put strap on yoga mat.
Keep practicing the tie. It will become second nature. Enjoy the ease of carrying your mat securely to your next class or practice spot!
Frequently Asked Questions (FAQ)
h4. Q: My mat is very thick. Will a standard strap work?
- A: Standard straps often work, but you might need a longer one. The loops need to be big enough to go around the thicker roll. Check the strap length before buying if you have a very thick mat. Some straps are marked for thicker mats.
h4. Q: Can I use anything else as a yoga mat strap?
- A: Yes, in a pinch, you could use a belt, a scarf, or a piece of rope. However, dedicated yoga straps are usually made of soft, wide fabric that is more comfortable to carry on your shoulder than rope or a thin belt. They are designed for this purpose.
h4. Q: How tight should I tie the strap?
- A: Tie it snug enough so the mat does not unroll or slip out easily. You should not need extreme force to tighten it. If you tie it too tight, it can be hard to untie, especially with knots. For loop straps or buckle straps, just tighten until the mat feels secure.
h4. Q: One end of my mat always pops open. How can I fix this?
- A: Make sure you are rolling your mat very tightly from the start. Also, ensure your strap loops or knots are right at the very ends of the rolled mat. They should be holding the ends shut like rubber bands.
h4. Q: My strap keeps slipping off my shoulder. What can I do?
- A: Try wearing the strap across your body instead of just over one shoulder. This usually provides more stability. Also, check the material of the strap and your shirt – some smooth fabrics can cause straps to slip more easily. A wider strap might also help distribute weight better and feel more stable. Make sure the mat is balanced on the strap.
This FAQ covers common questions you might have after learning how to tie a yoga mat strap securely. Keep practicing, and you’ll become a pro at carrying your mat!